Nimbusec KB
This book includes information about Nimbusec related topics.
- API
- Server Agent
- FAQ
- Configuration
- Reputation
- Transport Layer Security (TLS)
- Verifying PDF Integrity
- Compliance Monitoring Issues
- Security Header Ratings
- Two factor authentication
- Getting Started
- Understand Nimbusec Results And Alerts
- Alert actions
- Blacklist alerts
- Content alerts
- Fading out results
- Server side alerts
- Reputation Alerts
- Issue and Event overview
- Nimbusec Website Security Monitor Issue Types 2026
- Configuration Alerts
- Guides
- Integration Projects
- Nimbusec Compliance Monitor Issue Types
- Integrations
API
Information to our Nimbusec API
API Documentation
APIv3 docu:
https://openapi.nimbusec.com/?urls.primaryName=Nimbusec%20Website%20Security%20API%20v3#/
FQL Documentation
Server Agent
Additional information about the Nimbusec Server Agent
Installation on Linux
Installation
This guide describes the installation of the Nimbusec Server Agent. The Server Agent is optional for the function of the product, but improves the detection rate greatly. Therefore, it is strongly recommended to install the Server Agent. Installation on Linux and BSD Installation.
Requirements
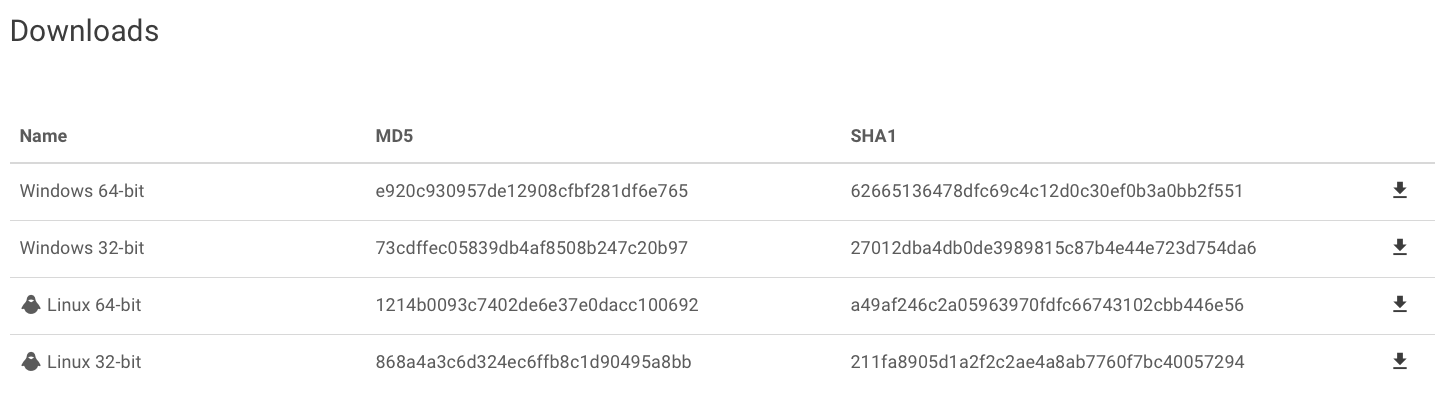
- Download the right Server Agent version for your operating system and architecture from the nimbusec portal.

- Copy the downloaded file to your server (e.g. via scp)
- Create a directory for the Server Agent installation. This can be any directory you like, but we recommend a directory like
/opt/nimbusec - Move the Server Agent and the configuration file in the newly created directory
- Make sure the Server Agent file is executable:
chmod +x /opt/nimbusec/agent - Create a (e.g. daily) cronjob to execute the agent
Create a Cronjob
We recommend two different ways to run our Server Agent:
Method 1: cron.daily
The easiest method is to install a script under /etc/cron.daily. This script will get executed on a daily basis, but the exact time is system dependent. The script would look like the following (make sure it's executable):
/etc/cron.daily/nimbusec
#!/bin/bash
/opt/nimbusec/agent -config /opt/nimbusec/agent.conf
Note: This cron job will run the nimbus-agent as user root! It is not required, nor recommended, to run the Server Agent as user root! To run the Server Agent as a different user, see section Security.
Method 2: crontab
To get more control over the exact time when the agent is run, create a cron job. A cron job to start the Server Agent every day at 1am would look like this:
0 1 * * * /opt/nimbusec/agent -config /opt/nimbusec/agent.conf
Note: It is not required, nor recommended, to run the Server Agent as user root! Please add the cron job to an appropriate user, see section Security.
Security
We strongly recommend to run the Server Agent as different user than root.
It is neither required, nor recommended, to run the Server Agent as user root. This section will describe the steps necessary to run it as a different user.
Select a user for the Server Agent to run as who has the following permissions (Recommendation: Run the Server Agent as the same user, as the web server is running or with a different user that has the same permissions as the web servers user):
- The user must have read permission on all files and directories it should scan and monitor.
- The user must have read permission on the configuration file.
- The user must have write permission for the temporary file specified in the configuration.
- Adapt the cron job to start the Server Agent as appropriate user (in the examples as
www-data):
If you have to use the cron.daily method, change the script to something like this: /etc/cron.daily/nimbusec
#!/bin/bash
su -c "/opt/nimbusec/agent -config /opt/nimbusec/agent.conf" www-data
or
#!/bin/bash
sudo -u www-data /opt/nimbusec/agent -config /opt/nimbusec/agent.conf
If you use the traditional crontab method, simply add the cron job to the appropriate user instead of root:
crontab -u www-data -e
Run Server Agent in chroot environment
If you want to further restrict the Server Agent, you can also run it in a chroot environment. Our support will be glad to assist you.
Proxy Configuration for Server Agent
To enable use of a proxy for upload to the Nimbusec API, set the environmental variable "http_proxy" using following syntax: http_proxy=http://[user:pwd@]proxy-ip:port/
An example would be: 'export http_proxy=http://username:pwd@meinproxy:8080'
Logging
You may want to log error messages to a logfile instead std.out. Thats of course no problem. Just pipe the output of the agent to the desired file location like this:
/opt/nimbusec/agent -config /opt/nimbusec/agent.conf > /opt/nimbusec/logs/agent-out.log 2> /opt/nimbusec/logs/agent-err.log
Installation on Windows
This document describes the Install Process of the nimbusec Server Agent under Windows Server 2008 and 2012. The Server Agent adds extended functionality to the nimbsuec service.
Installation
- Download the appropriate version of the Server Agent for your Server from https://portal.nimbusec.com/einstellungen/serveragent
- Copy the the downloaded file to your server and extract its contents. You can choose freely where you want to keep the files. The only requirement is that the user, that will run the Server Agent can access this location and execute the binary.
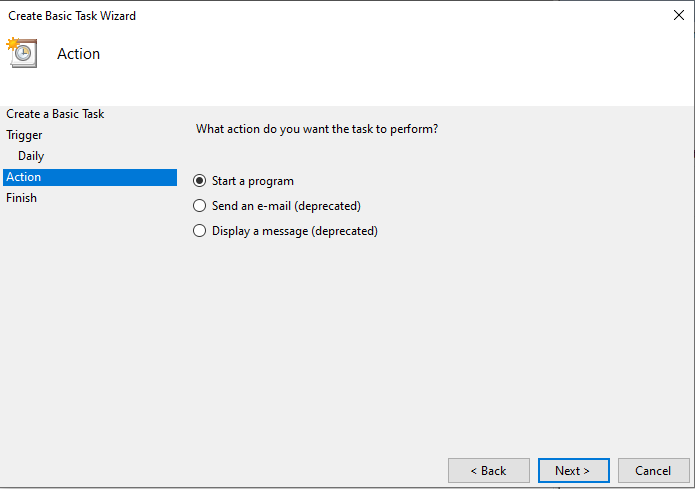
Task Scheduling
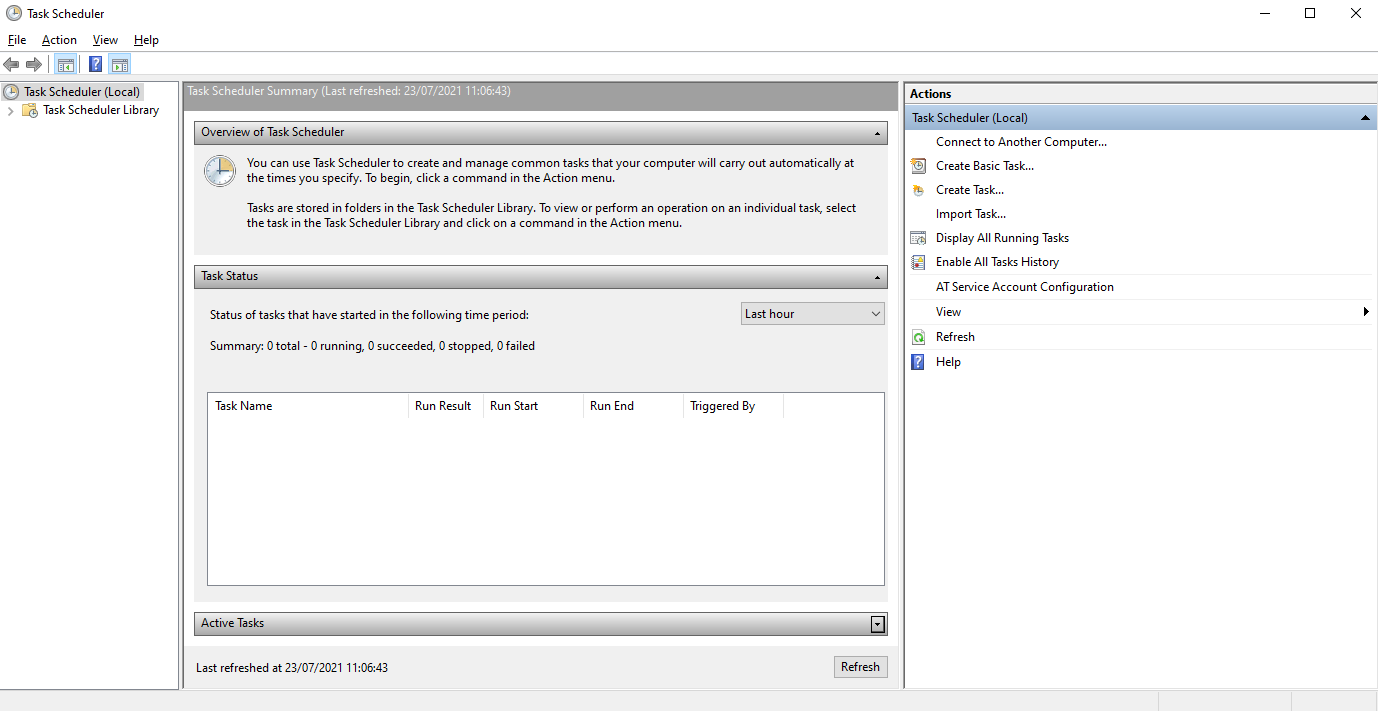
- Open the Task Scheduler

- Select 'Create Basic Task'
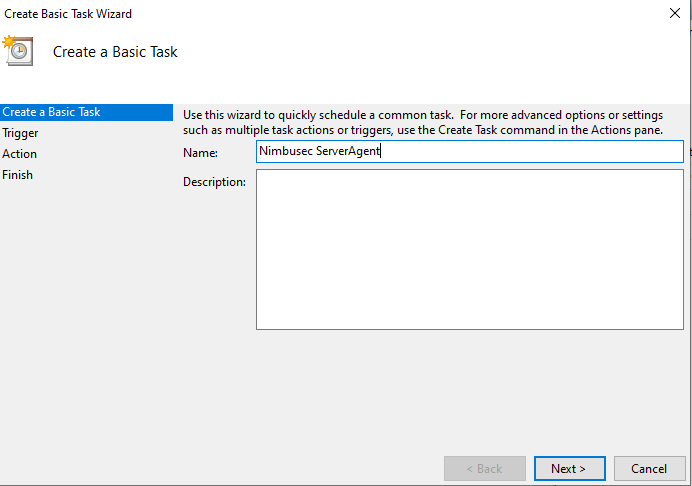
- Enter a name of the new Task

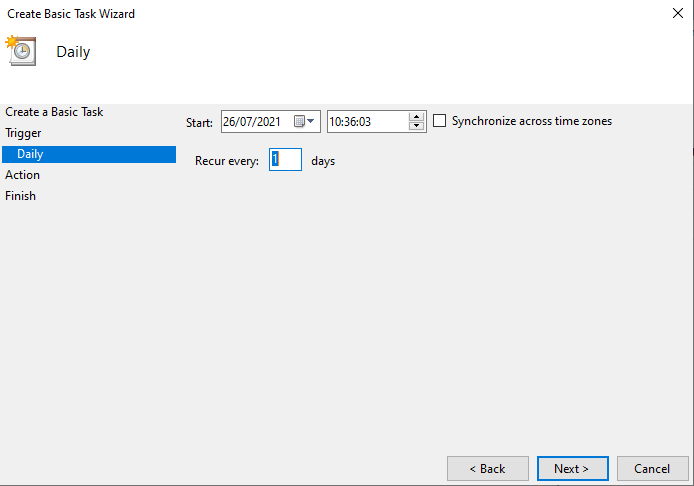
- On the next two screens you can select how often the Server Agent should be run

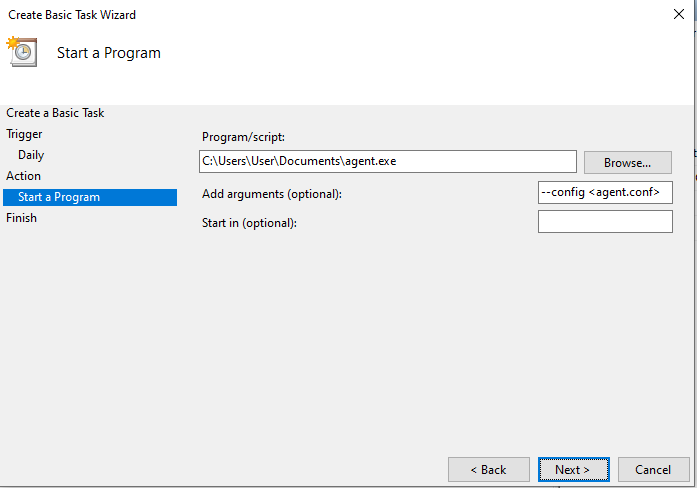
- Select 'Start a Program' as Action for the Task

- Click on Browse to select the Server Agent (agent.exe). In the Field 'Add arguments' add the string -config < C:\path\to\agent.conf > (replacing < C:\path\to\agent.conf > with the path to the config file)

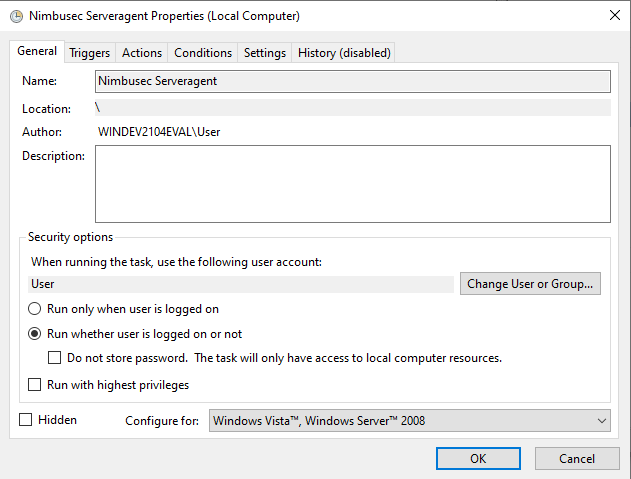
- On the next Screen please tick the checkbox 'Open the Properties dialog for thes task when I click finish' and confirm the screen by clicking 'Finish'
- A new windows will open where you can select which User should execute the Server Agent. Please make sure to select 'Run whether user is logged on or not'. Otherwise the Server Agent will not be run in the background.

Proxy Configuration for Server Agent
To enable use of a proxy for upload to the Nimbusec API, set the environmental variable "http_proxy" using following syntax: http_proxy=http://[user:pwd@]proxy-ip:port/ For the Windows Command Prompt an example would be: 'set http_proxy=http://username:pwd@meinproxy:8080'
Agent Configuration
This how-to describes the manual configuration of the Server Agent
Known Limitation
Please note: The upload size of the analysis result is limited to 750MB. To ensure consistency of results, the data will not be analysed if the limit is exceeded.
All errors of the agent, including https communication with the Nimbusec API will be printed to the terminal.
Format
The format of the Server Agent configuration must be in valid JSON. Otherwise the SErver Agent will fail to start. This can be tested with JSON Lint
An example configuration looks like:
Single domain configuration
agent.conf (Linux)
{
  "key": "abc",
  "secret": "abc",
  "tmpfile": "hashes.txt",
  "domains": {
    "example.com": "/var/www/example.com"
  },
  "excludeDir": [ ],
  "excludeRegexp": [ ],
  "includeDir": [ ],
  "includeRegexp": [ ],
  "apiserver": "https://api.nimbusec.com"
}
agent.conf (Windows)
{
  "key": "abc",
  "secret": "abc",
  "tmpfile": "hashes.txt",
  "domains": {
    "example.com": "C:\\iis\\example.com"
  },
  "excludeDir": [ ],
  "excludeRegexp": [ ],
  "includeDir": [ ],
  "includeRegexp": [ ],
  "apiserver": "https://api.nimbusec.com"
}
Multi domain configuration
agent.conf (Linux)
{
  "key": "abc",
  "secret": "abc",
  "tmpfile": "hashes.txt",
  "domains": {
    "example.com": "/var/www/example.com",
    "demo.co.at": "/var/www/demo.co.at"
  },
  "excludeDir": [ ],
  "excludeRegexp": [ ],
  "includeDir": [ ],
  "includeRegexp": [ ],
  "apiserver": "https://api.nimbusec.com"
}
agent.conf (Windows)
{
  "key": "abc",
  "secret": "abc",
  "tmpfile": "hashes.txt",
  "domains": {
    "example.com": "C:\\iis\\example.com",
    "demo.co.at": "C:\\iis\\demo.co.at"
  },
  "excludeDir": [ ],
  "excludeRegexp": [ ],
  "includeDir": [ ],
  "includeRegexp": [ ],
  "apiserver": "https://api.nimbusec.com"
}
| Field | Description |
|---|---|
| key | Your assigned customer key for the Server Agent. The key can be via https://portal.nimbusec.com/einstellungen/serveragent or by requesting a new from support@nimbusec.com. The key is unique per server and must not be used across multiple servers. |
| secret | Your assigned customer secret for the Server Agent. The secret can be retrieved via https://portal.nimbusec.com/einstellungen/serveragent or by requesting a new from support@nimbusec.com . The secret is bound to a key. |
| tmpfile | Path to a writable location where the Server Agent can store it's temporary file. This file contains the data that is sent to the nimbusec API to analysis and will not get deleted after, but overwritten with each run. Each domain counts as a separate run. This enables you to inspect the data we send to our API. |
| domains | A key value map of domain names and corresponding document roots. The domain name must match the domain name in the portal, else the upload will fail with a access denied message. The document root is the root directory which should be scanned. On Windows the backslashes must be escaped. You can also use forward slashes on Windows. |
| excludeDir | A list of directories which should be skipped. The directories must be absolute file paths. Neither baseline nor webshell analysis will be performed inside these directories! |
| excludeRegexp | A list of regular expressions. If a regular expression matches a file path, the file will be ignored. Be very sure to make the regular expression as strict as possible. The syntax of the regular expressions accepted is the same general syntax used by Perl, Python, and other languages. More precisely, it is the syntax accepted by RE2 and described at http://code.google.com/p/re2/wiki/Syntax , except for \C. Neither baseline nor webshell analysis will be performed inside these files! |
| includeDir | A list of directories which should be included. The directories must be absolute file paths. If this list contains entries, only directories, that begin with the specified values will be regarded for baseline and webshell analysis. All other directories will be disregarded. E.g. document root is /var/www, if /var/www/a is specified /var/www/a files and directories below will be analysed while everything else below /var/www will be ignored. |
| includeRegexp | A list of regular expressions. If a regular expression matches a file path, the file will be anylsed. Be very sure to make the regular expression as strict as possible. The syntax of the regular expressions accepted is the same general syntax used by Perl, Python, and other languages. More precisely, it is the syntax accepted by RE2 and described at http://code.google.com/p/re2/wiki/Syntax , except for \C. Neither baseline nor webshell analysis will be performed inside these files! |
| apiserver | The url of our API server. Only change this if told you by the nimbusec support! |
Command Line Options
The agent can be run with the following parameters: (Not all options are available in all versions of the agent)
| Parameter | Version | Description |
|---|---|---|
| -h | * | Displays help and exits. |
| -config string | * | Configuration file for nimbusec agent (default "agent.conf") |
| -follow-symlinks TRUE / FALSE | * | Toggle following symlinks (default true) |
| -maxprocs int | * | Maximum number of processes used (default 2) |
| -v | 11 | Displays the version and exits. |
| -yara | 11 | Enable YARA engine. |
Docker Image
Nimbusec Server Agent Docker Image
This docker image is intended for use with the Website Security Monitor by KSV1870 Nimbusec (https://nimbusec.com). Use of this image requires an active subscription to Website Security Monitor.
This image is published under https://hub.docker.com/r/ksv1870nimbusec/server-agent
What is Nimbusec Server Agent Docker Image?
Let's answer this question step by step.
Nimbusec Website Security Monitor is a cloud-based monitoring solution to check for malicious malipulations on websites.
Nimbusec Server Agent is the server side component of Website Security Monitor. It checks PHP code that is interpreted on the server and therefore cannot be analysed through http requests (as it is interpreted before being sent to the client).
Nimbusec Server Agent Docker Image is a convenient method of distributing the Server Agent to Nimbusec Customers. Its sole purpose is to run the contained server agent.
Basic Assumptions
The server agent runs unprivileged. Per default it runs with the user id 1000. You can supply any user ID if you need to match the permissions of your scan target. While you can run the container privileged or as user root, this is strongly discouraged.
Configuration
Nimbusec Server Agent uses a config file to read instructions. This config file adheres to the following structure.
{
  "key": "$KEY",
  "secret": "$SECRET",
  "domains": {
    "$DOMAIN": "$TARGET_DIR"
  },
  "tmpfile": "/tmp/nimbusagent-hashes.txt",
  "excludeDir": [],
  "excludeRegexp": [],
  "includeDir": [],
  "includeRegexp": [],
  "apiserver": "$API_SERVER"
}
All $-Placeholders need to be provided except for $TARGET_DIR and $API_SERVER. For these two this docker image can fall back on the following default values:
- $TARGET_DIR: /app/scan
- $API_SERVER: https://api.nimbusec.com
In addition to the configuration options listed above there is one setting that can only be enabled via Environment Variable in this image. Adding the env YARA=true will enable the optional support for yara scan rules. The ruleset is downloaded from the API Server when the server agent is executed.
For additional Information please refer to the Knowledge Base.
Mount your own agent.conf
The most flexible way to provide a configuration is to mount to the container-path /app/agent.config (please note, this path and filename is mandatory). This mount can be read-only
You need to replace the $KEY an $SECRET placeholders from the above example with the corresponding values provided by KSV1870 Nimbusec. For $DOMAIN you can select any Domain that you have configured in your Nimbusec Website Security Monitor Account. Please note, you have to use the correct Style of the domain, i.e. example.com and www.example.com are treated as different domains.
docker run -v /local_path_to_config/agent.conf:/app/agent.conf:ro -v /var/www/html:/app/scan:ro <dockerimage>
This example mounts a local config file and the scan dir of /var/www/html into the container, both read-only.
Pass Environment Variables
If you don't want to provide a custom config file you can pass the Placeholder values (KEY, SECRET, DOMAIN and optionally TARGET_DIR) as environment variables (docker via -e, docker-compose via environment).
docker run -v /var/www/html:/app/scan:ro -e KEY=api-key -e SECRET=api-secret -e DOMAIN=example.com <dockerimage>
This example mounts the target /var/www/html into the container and provides key, secret and domain via enviroment variable.
What gets scanned?
The directory to scan needs to be mounted into the container, either into the default location /app/scan or in a custom directory which is specified via your agent.conf or the TARGET_DIR environement variable. This mount should be read-only. The server agent will not write into this directory.
docker run -v /local_path_to_config/agent.conf:/app/agent.conf:ro -v /var/www/html:/mnt/html:ro -e TARGET_DIR=/mnt/html -e YARA=true <dockerimage>
This example mounts the local config file and the target dir into the container. As the target dir in the container is different from /app/scan we have to specify the container directory to scan as /mnt/html. In addition the YARA env variable enables yara support and downloads the scan rules form the api server.
Recommendations
- It is recommended that you prefer mounting your own agent.conf file over environment variables. It is easier for you to check what the agent is doing where. Additionally you can scan multiple domains with one config. This is not possible with the env variables.
- It is recommended to mount the scan directory under /app/scan. Fallbacks will assume this directory if there is misconfiguration.
- It is recommended to mount all files and directories mentioned so far as read-only. There is one optional exception which is explained in the following "Advanced" section.
Advanced
If you want additional insight into the workings of the server agent you can mount the container tmp dir to a local directory. This mount has to be read/write and has to have these permissions for the User ID that runs the agent (either 1000 or a value that you can set via the -u/--user flag).
docker run -v /local_path_to_config/agent.conf:/app/agent.conf:ro -v /var/www/html:/app/scan:ro -u 1234 <dockerimage>
Assuming that the data in the local directory /var/www/html is only readable to user ID 1234, you can provide this ID to the docker container. The server agent in the container is executed with the user ID 1234.
FAQ
Configuration
Outdated CMS Version
The use of an outdated version of a content management system (CMS) can lead to various security issues. A list of known security vulnerabilities sorted by version number can be found in the publicly accessible CVE Details database¹. In many cases the only countermeasure is to update to the latest version.
Solution
The best protection against security vulnerabilities due to outdated versions are regular updates. Always use the current version and check periodically for new updates. This also applies for plugins, themes and other third party products used in combination with your CMS.
Vulnerable CMS Version
Your Content Management System (CMS) has known security vulnerabilities which can be found in the publicly accessible CVE Details database¹. Depending on the severity of the vulnerability this may cause security incidents like confidential information disclosure, bypassing access control mechanisms,attacks against users as well as a take-over of your systems by an attacker.
Solution
Stay informed about known vulnerabilities of your CMS and follow instructions of the vendor to fix security issues. Furthermore, always use the latest version and check periodically for new updates. This also applies for plugins, themes and other third party products used in combination with your CMS.
Downloadable Source Code
Source code on your web site can be accessed and downloaded. While this is not considered as a security vulnerability per se, this may provide valuable information to an attacker for a successful attack, such as programming language specific security holes, version numbers located in the source code, programming errors and bugs that lead to possible attacks, etc.
Solution
Make sure your source code is securely stored and it can not be accessed by unauthorized persons.
Reputation
Hatred or Violence
Browser plug-ins like WOT [1] allow to evaluate a website by the user, e.g.regarding questionable contents like hate speech, racism or discrimination. Your website has received poor ratings in this category. The result is that the plug-in warns users about a possible danger when visiting your website. This can lead to a damage of your reputation.
Solution
Monitor your users’ behaviour and try to find the reason for the poor evaluation. If you suspect that your website has been rated bad unjustified by the intention to harm your reputation, you have the possibility to contact the plug-in developers [2].
Misleading
Browser plug-ins like WOT [1] allow to evaluate a website by the user, e.g. point out misleading, incorrect or unethical content or unproven product claims. Your website has received poor ratings in this category. The result is that the plug-in warns users about a possible danger when visiting your website. This can lead to a damage of your reputation.
Solution
Monitor your users’ behaviour and try to find the reason for the poor evaluation. If you suspect that your website has been rated bad unjustified by the intention to harm your reputation, you have the possibility to contact the plug-in developers [2].
Adware
Browser plug-ins like WOT [1] allow to evaluate a website by the user, e.g.regarding unwanted advertisements like highly annoying ads and pop-ups. Your website has received poor ratings in this category. The result is that the plug-in warns users about a possible danger when visiting your website. This can lead to a damage of your reputation.
Solution
Monitor your users’ behaviour and try to find the reason for the poor evaluation. If you suspect that your website has been rated bad unjustified by the intention to harm your reputation, you have the possibility to contact the plug-in developers [2].
Experience
Browser plug-ins like WOT [1] allow to evaluate a website by the user, e.g. user experience regarding unacceptable user experience, low quality products or unreliable deliveries. Your website has received poor ratings in this category. The result is that the plug-in warns users about a possible danger when visiting your website. This can lead to a damage of your reputation.
Solution
Monitor your users’ behaviour and try to find the reason for the poor evaluation. If you suspect that your website has been rated bad unjustified by the intention to harm your reputation, you have the possibility to contact the plug-in developers [2].
Scam
Your website has been blacklisted as it has been identified as fraud. This might indicate that your website has been hacked and third parties may have access to your system. This means that your website may harm users by phishing attacks and scam which can have a negative impact on your reputation.
Solution
Carry out an anti virus scan immediately and contact your web hosting provider to inform him about you being hacked. Furthermore, please check the following information that may help you to resolve this issue [1]. If you suffer from hacking attacks frequently or if the problem persists even after the recovery we strongly recommend to consult an IT security expert to help you.
Illegal
Your website has been blacklisted as it has been identified to hosting malicious or illegal content. This might indicate that your website has been hacked and third parties may have access to your system. In Addition to a severe damage of your reputation, hosting illegal and malicious content may have legal consequences for you.
Solution
Carry out an anti virus scan immediately and contact your web hosting provider to inform him about you being hacked. Furthermore, please check the following information that may help you to resolve this issue [1]. If you suffer from hacking attacks frequently or if the problem persists even after the recovery we strongly recommend to consult an IT security expert to help you.
Potentially Unwanted Application (PUA)
Browser plug-ins like WOT [1] allow to evaluate a website by the user, e.g. if the site installs or is involved in the distribution of potentially unwanted programs or applications (PUA) like toolbars without notifying the user. Your website has received poor ratings in this category. The result is that the plug-in warns users about a possible danger when visiting your website. This can lead to a damage of your reputation.
Solution
Monitor your users’ behaviour and try to find the reason for the poor evaluation. If you suspect that your website has been rated bad unjustified by the intention to harm your reputation, you have the possibility to contact the plug-in developers [2].
SPAM
Your website has been blacklisted as it has been identified to send spam. This might indicate that your website has been hacked and third parties may have access to your system. Furthermore, this can refer to insecure configuration of a mail server which is used as an open relay. Another reason for blacklisting can be poor user evaluation via browser plugins such as the WOT Add-on [1] which allows users to tag websites if they are used to sending spam or if they are referred to in spam mails.
The consequence is, additionally to a great loss of reputation, impairment of the e-mail traffic on the system as mails are marked as spam mails.
Solution
Try to figure out the reason why your website has been blacklisted. Check if your system can be used as an open relay and secure your system’s configuration [2]. Moreover, it is recommended to carry out an anti virus scan and to contact your web hosting provider to inform him about your problem. If the problem was due to malicious software, please check the following information that may help you to resolve this issue [3].
If you managed to solve the underlying problem follow the blacklist removal process of the specific blacklist provider.
If you suffer from being blacklisted frequently or if the problem persists even after fixing your configuration issues we strongly recommend to consult an IT security expert to help you.
- [1] https://www.mywot.com/
- [2] http://www.mailradar.com/openrelay/
- [3] https://developers.google.com/search/docs/advanced/security/overview
Malware
Your website has been blacklisted as it has been identified to hosting malicious software. This might indicate that your website has been hacked and third parties may have access to your system. This means that your website may harm users which can have a negative impact on your reputation.
Solution
Carry out an anti virus scan immediately and contact your web hosting provider to inform him about you being hacked. Furthermore, please check the following information that may help you to resolve this issue [1]. If you suffer from hacking attacks frequently or if the problem persists even after the recovery we strongly recommend to consult an IT security expert to help you.
Reputation
Browser plug-ins like WOT [1] allow to evaluate a website by the user regarding several categories. Your website has received general poor ratings by them indicating a bad reputation. The result is that the plug-in warns users about a possible danger when visiting your website.
Solution
Monitor your users’ behaviour and try to find the reason for the poor evaluation. If you suspect that your website has been rated bad unjustified by the intention to harm your reputation, you have the possibility to contact the plug-in developers [2].
Suspicious Links
The domain of an outgoing link found on your website is on a blacklist. There are two possible causes. Either your website has been hacked, and someone placed malicious links on your website, or the legit website you are linking to has been hacked and was indentified by a blacklist. Both can cause an immediate reputation loss, because search engines use outgoing links in their ranking calculation.
Solution
Review the links. If they lead to legit websites, inform the owner of that website about the blacklist listing. If they lead to unknown/malicious websites delete them and take further actions to resecure your website. Please check the following information that may help you to resolve this issue [1]. If you suffer from hacking attacks frequently or if the problem persists even after the recovery we strongly recommend to consult an IT security expert to help you.
Phishing
Your website has been blacklisted as it has been identified as phishing site. This might indicate that your website has been hacked and third parties may have access to your system. Your website may be misused, by masquerading as a trustworthy entity to obtain sensitive information from your users.
Solution
Please check the following information that may help you to resolve this issue [1]. If you suffer from hacking attacks frequently or if the problem persists even after the recovery we strongly recommend to consult an IT security expert to help you.
Transport Layer Security (TLS)
Certificate
Legacy Certificates
By legacy we mean distrusted certificates. An example from the past is the distrust of the Symantec PKI [1]. The best solution to date is, to replace the existing distrusted certificate with a new one from any Certificate Authority trusted by Google, Mozilla, Apple and Microsoft (and probably other browser vendors).
Misconfigured Chain
A correctly configured webserver should provide clients with the whole certificate chain up to the root certificate. If the server delivers a misconfigured certificate chain (e.g. incomplete or wrongly sorted) most browsers recover by verifying the certificate via AIA. [1]
This process, however, slows down page loading and browsers that do not support AIA may show the user a security warning.
Revoked Certificate
A Certificate may be revoked for various reasons (e.g. (possible) loss of the private key, domain closed, etc...). This means that the certificate is not valid anymore and users are shown a warning page in most browsers.
Protocol
TLS (Transport Layer Security) or SSL (Secure Socket Layer) is a protocol used to securely transmit encrypted data. Since SSL v3 the protocol is known as TLS, where TLS 1.0 corresponds to SSL v3.1. The currently recommended versions are TLS 1.2 and TLS 1.3. All the other versions are considered weak or contain vulnerabilities.
SSL v3/SSL v3.1/TLS 1.0
Those versions have also considerable security vulnerabilities. A well known attack is the Chained Initialization Vector CBC Mode MiTM Weakness (BEAST) attack. The attack is based on the usage of the CBC mode for encrypting the block ciphers and enables Man-in-The-Middle attacks which can be used to obtain plaintext HTTP header data. [1] Additionally, the key derivation function for the master key depends on a MD5 hash function. The possibility of collision based attacks let the protocol be considered as insecure in general. In October 2014 the POODLE attack has been published. This attack targets all implementations of SSL v3/TLS 1.0 which leads to the point that this protocol is not recommended to use any more. Using a Man-in-The-Middle attack, encrypted data can be decrypted and an attacker can gain access to plain text data. [2]
- [1] CVE-2011-3389
- [2] CVE-2014-3566
TLS 1.1 deprecation
The Internet Engineering Task Force (IETF) no longer recommends the use of TLS versions older than TLS 1.2. According to the following draft document (https://datatracker.ietf.org/doc/draft-ietf-tls-oldversions-deprecate/) TLS 1.0 and TLS 1.1 are deprecated. Negotiation of TLS 1.0 or 1.1 from any version of TLS MUST NOT be permitted. All major browser vendors are deprecating support for these versions of TLS by March 2020.
- [1] Google: https://blog.chromium.org/2019/10/chrome-ui-for-deprecating-legacy-tls.html
- [2] Mozilla: https://blog.mozilla.org/security/2018/10/15/removing-old-versions-of-tls/
- [3] Apple: https://webkit.org/blog/8462/deprecation-of-legacy-tls-1-0-and-1-1-versions/
- [4] Microsoft: https://blogs.windows.com/msedgedev/2018/10/15/modernizing-tls-edge-ie11/
Ciphers
DES
The recommended key length for TLS is at least 128 bits. [1] Keys with a shorter length could be broken and would allow the decryption of communications. The Data Encryption Standard (DES) is using only 56 bits. Therefore, DES based cipher suites should not be used.
3DES
3DES or Triple-DES is a cryptographic block cipher algorithm which uses 64-bit blocks for data encryption between a client and server. Mostly used for establishing HTTPS connections, this cipher is known to be weak due to his short block size (in comparison, AES uses 128-bit blocks). With the emergence of the Sweet32 attack, there is a documented way of exploiting this trait. [1] The security measures of 3DES start to crumble whenever the birthday bound is reached. The point, at which a collision between the encrypted blocks is expected. Under certain circumstances, the attacker can then retrieve sensible data like session cookies.
Export
Export Cipher Suites are weak by design. They are encrypted but only with weak key material. This leads to the fact that the encryption can be broken very easily as there are used 40 bit or 56 bit algorithms.
IDEA
IDEA uses 64-bit blocks for encryption which is considered as weak. Per RFC5469 this cipher is deprecated. It has been completely removed in TLS 1.2.
LOW
LOW are low strength encryption cipher suites, using 64 or 56 bit encryption algorithms but excluding export cipher suites. As of OpenSSL 1.0.2g, this is disabled in default builds. Src: OpenSSL
Null
Using Null ciphers mean that no encryption for the data is used at all. They do not offer any privacy or security for the user of a web service. For this reason it is urgently recommended not to use Null ciphers.
RC2
It is advised not to use RC2 for encryption as it has an insufficient key size and is therefore seen as untrustworthy.
RC4
It has been known that RC4 has a weakness in its encryption and should therefore be avoided. On the other hand, there is no secure alternative as many clients still require RC4 support. However, since March 2013, RC4 is demonstrably broken and is classified as insecure in combination with TLS (Transport Layer Security). [1] The attack demonstrates that parts of the plain text can be recovered. For this reason, it is recommended that the support for this cipher should be removed in the near future.
- [1] RC4 Attack
SEED
SEED is an older South Korean cipher. OWASP recommends to not use this (and other older) cipher anymore.
Hash Functions
MD5
The use of the MD5 hash algorithm should be avoided in general as this algorithm is prone for collision attacks. [1]
SHA1
Known for its cryptographic and mathematical weaknesses, the SHA-1 hash algorithm was already replaced by the SHA-2 ciphers family as the recommended standard in 2002. As of begin of 2017, popular browser vendors like Microsoft, Mozilla or Google will stop accepting SHA-1 signed TLS certificates. Instead, the browsers will start displaying a warning sign if any certificate in the trust chain uses the outdated algorithm. Therefore, the upgrade of the web server's and of all intermediate certificates to the SHA-2 family should be considered as soon as possible.
Key Exchange Algorithms
Anonymous Diffie-Hellmann
Anonymous Diffie-Hellman Cipher Suites are used for anonymous Diffie-Hellman communications in which neither party is authenticated. Therefore this mode is vulnerable to Man-in-The-Middle attacks. [1]
Verifying PDF Integrity
The Cyber Risk Rating Portal issues multiple documents at the end of the rating process for every supplier. The documents are among others the Cyber Risk Rating Certificate which contains the overall rating scores for the supplier along with the WebRisk score and the Cyber Risk Rating Assessment Report that lists the answers of the supplier along with the validation results.
To ensure the integrity of the documents and prevent potential compromises by others during the download process, a signature file for each document is added that contains the signed digest per document. By signing the digest, the document integrity is guaranteed as changing the document's content would consequently create a different digest, failing to match the provided signature. Additionally, the signature cannot be altered given that it was signed using our own secret RSA private key. The algorithms used for the process are SHA256 to create digest of the document and RSA PKCS#1 v1.5 for the signing.
Verifying the integrity on the command line
It is advised to verify the integrity of each document after downloading them as a zipped archive. For each document, the corresponding signature file .sig represents the signed digest in byte form. Furthermore, the public key that was used on our side is required. It can be downloaded here: Cyber Risk Rating Signature Public Key.
The verification can be done using OpenSSL v1.1.1f or above.
$ openssl dgst -sha256 -verify crr-signature-key.pub -signature Cyber-Risk-Rating-Report-Valid.pdf.sha256.sig Cyber-Risk-Rating-Report-Valid.pdf
Verified OK
If the documents are compromised, the verification will fail. In this case, contact `support@nimbusec.com` immediately for further help.
$ openssl dgst -sha256 -verify crr-signature-key.pub -signature Cyber-Risk-Rating-Report-Valid.pdf.sha256.sig Cyber-Risk-Rating-Report-Compromised.pdf
Verification Failure
CyberRisk Rating Signature Public Key
You can download the signature key as file here: Cyber Risk Rating Signature Public Key,
or use the plain text version printed below:
-----BEGIN PUBLIC KEY-----
MIICIjANBgkqhkiG9w0BAQEFAAOCAg8AMIICCgKCAgEAwGd+TC2FkOrz/CqU9lUk
xNi8uhQ73D9YVlQ93Jkl4plVRYcquGOK0hLqWSTDkHAfd9fKCqgmJWF1X6eF/fz7
B6a7HeCHAPlut3aclEneJef03JWsLZWoMD724v7vDXHolUcDNHuICWQpWMpZ/xaM
E1FzNlzqSH41tF3YPOaxGiQA39+POxaWItYk7hBKBWhU6F4PBzZfM2gE/3AOqcRi
4DRFYPh3ZwIVTGqDtfiYMWUYLDI5u0KzdFne6qvBHflBwB1Nd9l3ckEFiv91s2Sg
3AaiXEqgSvLIL02tbmVnbfImVXksE9VeNWpr0LKWnTApheX++DQ0itB7zbg9JIfv
rEG9JNuP/dXlFjYRsBlsaz950vulzwwWjeHs6LikqHUz+4xy8+GU6vs0QFbvkHlD
DRcJGeCWsCiijh9dtM+yDcZfr8WjEr9AQfskMSfoWuVqAMBqJ05C51fDnZdbNLGy
0ubtIoI4cSIf7Rrow1iq8l4WsPoIZDRq2S0jJc3gLnAS6erlQoox/9A2ZWeCQPw9
iHixIVpQR/h6TKT6M4VQn+Ilw+Nj5o6yTzYEhq5nY64yH9zn0brhycANLhO/PnA1
rYaCorVRMFbr9UeysulqKBEk4TkEAWdUXdqSzM/Wdm2P0pQM7Y0vhMbqMSeYoGkX
o2lNrkxDioheGnwTsaFejtMCAwEAAQ==
-----END PUBLIC KEY-----
Compliance Monitoring Issues
General Information
In the world of website compliance, a lot of differnt compliance violotions can occour. Therefore we decided to make a clear separation of those violations and introduced different violation categories:
- Regulatory Violations
- Business Violations
Each category includes different types of violations that will be described in the corresponding section. The main differences are that regulatory violatens based on GDPR context prescribed by law and business violations based on custom rules that can be individually defined to meet each customers individual requiremnts.
Regulatory Violations
This category includes all detected problems that relates to the acutal GDPR context prescribed by law. The following types can be detected by the Nimbusec compliance monitor in the context of regulatory violations:
Cookie Opt-In
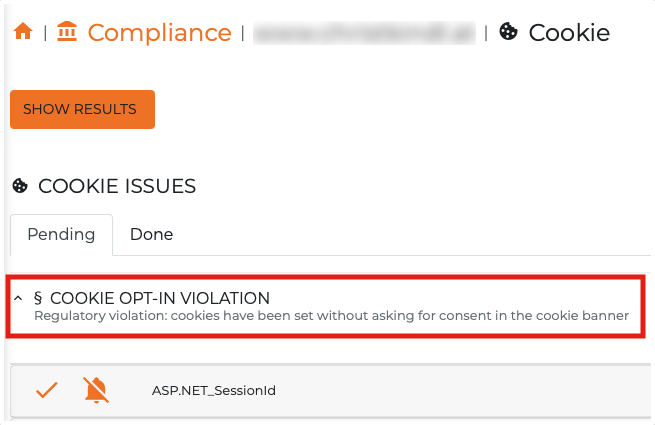
Generally, the Nimbusec Complaince Scan simulates a standard website user that visits a website, but does not perform any kind of interaction with it (e.g. allowing cookies, ...). For this vioaltion type, we collect all cookie information that was set from the website (before any kind of user interaction). This results in a clear list of cookies that were initially set/provided by the website. In the default configuration, if our simulated website user gets any kind cookies, a 'Cookie Opt-In' violation will be triggerd and shown in the compliance monitor. With other words, cookies have been set without asking for consent in the cookie banner.
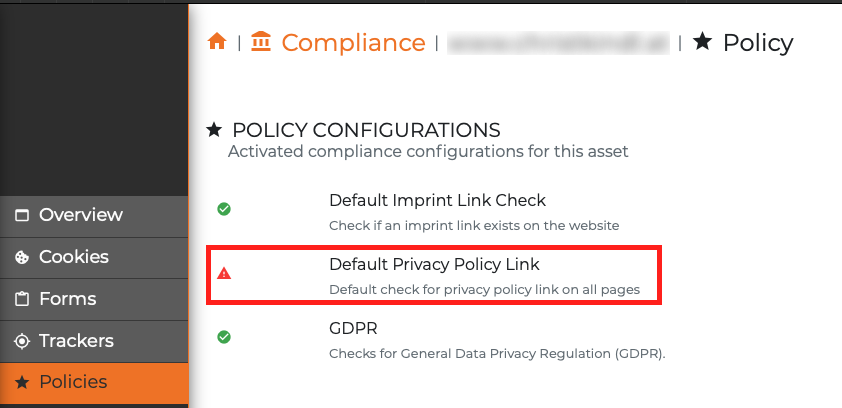
In the Nimbusec Compliance Monitor, this violation type can be seen in the compliance view of an asset:

By clicking on the "Details" button, all detected cookies can be seen.
In more detail, the Nimbusec compliance scan saves the following data:
example data:
| Name | Domain | Secure | HttpOnly | LifeTime | SameSite | ThirdParty | InServerResponse |
|---|---|---|---|---|---|---|---|
| cookie_name | www.example.com | false | false | -1 | N/A | true | false |
column description:
| Column | Description |
|---|---|
| Name | Name of the detected Cookie |
| Domain | Domain name where the described cookie was found |
| Secure | The Secure flag is an option that can be set by the server when sending a new cookie to the user in an HTTP response. The purpose is to prevent cookies from being observed by unauthorized parties due to sending the cookie in clear text. |
| HttpOnly | The HttpOnly flag is an additional security option for cookies. If this flag is set, the browser does not display the cookie through client-side scripts. |
| LifeTime | This parameter shows the validity of a cookie. |
| SameSite | The SameSite attribute shows if this cookie is restricted to a first-party or same-site context. |
| ThirdParty | This attribute shows if this cookie was distributed from the own web ressource or from an external one. (domain name matching) |
| InServerResponse | If the value of this attribute is true, this cookie was directly send from the server. If this value is false, the cookie was created and distributed via a JavaScript context. |
Cookie Banner (ToDo)
The Nimbusec Compliance Scan checks websites for the presence of a standard cookie banner. For this case, we check for a default set of various cookie banner implementations. If a custom cookie banner is used, the scan configuration has to be adjusted to detect non default cookie banners.
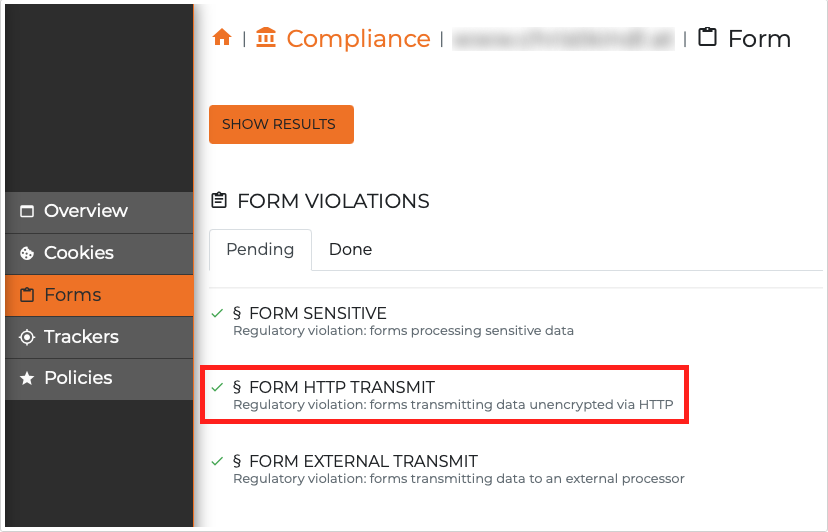
Form: HTTP-Transmit
For this case, our scan checks all availabe input forms that handles sensitive data. If the content of the input form will be send unencrypted (via HTTP), the Nimbusec Compliance Scan throws a Form: HTTP-Transmit violation. Unencrypted data transmission may be intercepted and the data could be seen in plain text.
By clicking on the "Details" button in the compliance view, all detected cookies can be seen.

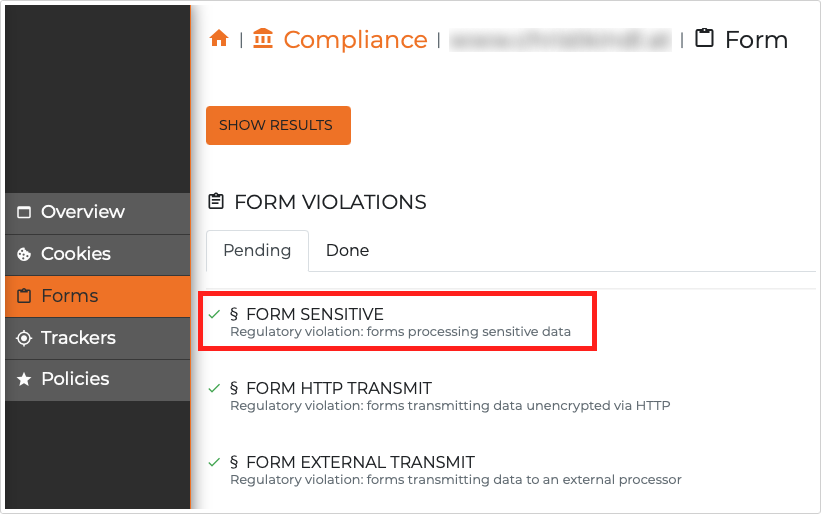
Form: Form-Sensitive
As mentioned above, the Nimbusec Complaince Scan checks all availabe input forms that handles sensitive data. If we detect such forms, a Form-Sensitive event will be triggered. This should help the users to identify those forms and may handle them in a different way.
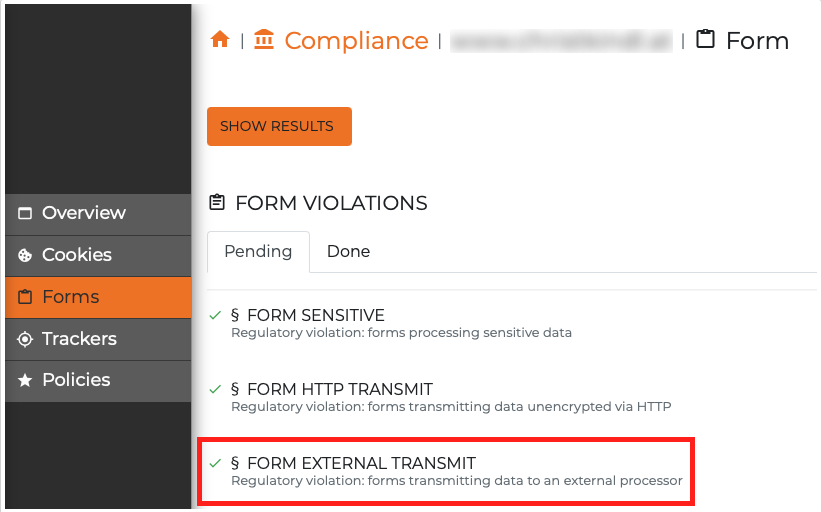
Form: External-Transmit
This type of violation gets triggerd if form data will be send to an external processor (e.g. to an external company that may performs user analytics tasks)
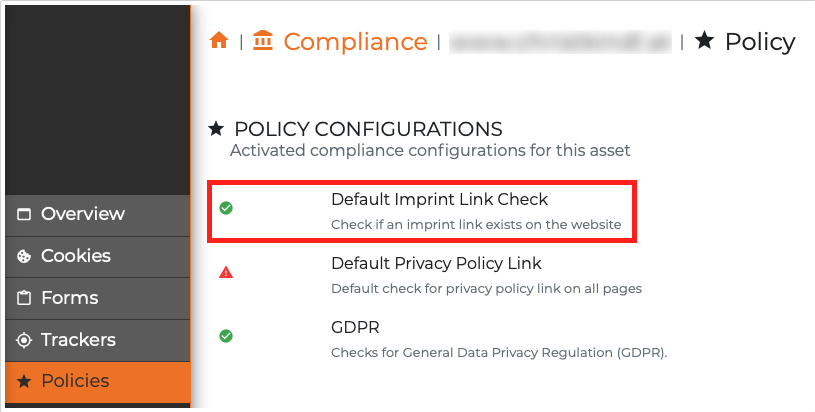
Imprint Policy
The presence of an imprint is a mandaroty regulation in GDPR. Our imprint policy checks the presence of an imprint link on the corresponding website. To detect it, we use predefined search patterns and apply them on the websites source code.
By clicking on the "Details" button in the compliance view, all defined polices can be seen.

Privacy Policy
The presence of a privacy statement is a mandaroty regulation in GDPR. Our privacy policy checks the presence of a privacy statement link on the corresponding website. To detect it, we use predefined search patterns and apply them on the websites source code.
Tracker
From our point of view, a tracker is any kind of software that collects or transmits data to an external ressource. Therefore, our Nimbusec Compliance Scan analyses the whole network traffic that is active during our simulated website user visits the site. From the GDPR point of view, before the user accepts the defined privacy policy, any kind of data collection or data transmission to third party systems is a violation against the given law.
Business Violations
This category represents the adjustable part of the Nimbusec Compliance Monitor. For each issue type a customized ruleset can be defined to identify violations against corporate guidelines. These adjustments (ruleset definition) will be realized by the Nimbusec Serivce Team according to the customers needs.
The following types can be detected by the Nimbusec compliance monitor in the context of business violations:
Cookies
For this type, a list of allowed cookie names can be defined (Cookie Whitelisting). If a detected cookies matches an entriy of the predefined list, it does not ceate an issue and will be acknowledged automatically.
This setup is very useful to close already known cookies and keep the focus on cookie violations.
Here is an example: Assume three cookies were found
In the Nimbusec Compliance Monitor, this violation type can be seen in the compliance view of an asset:

By clicking on the "Details" button, all detected cookie information can be seen.
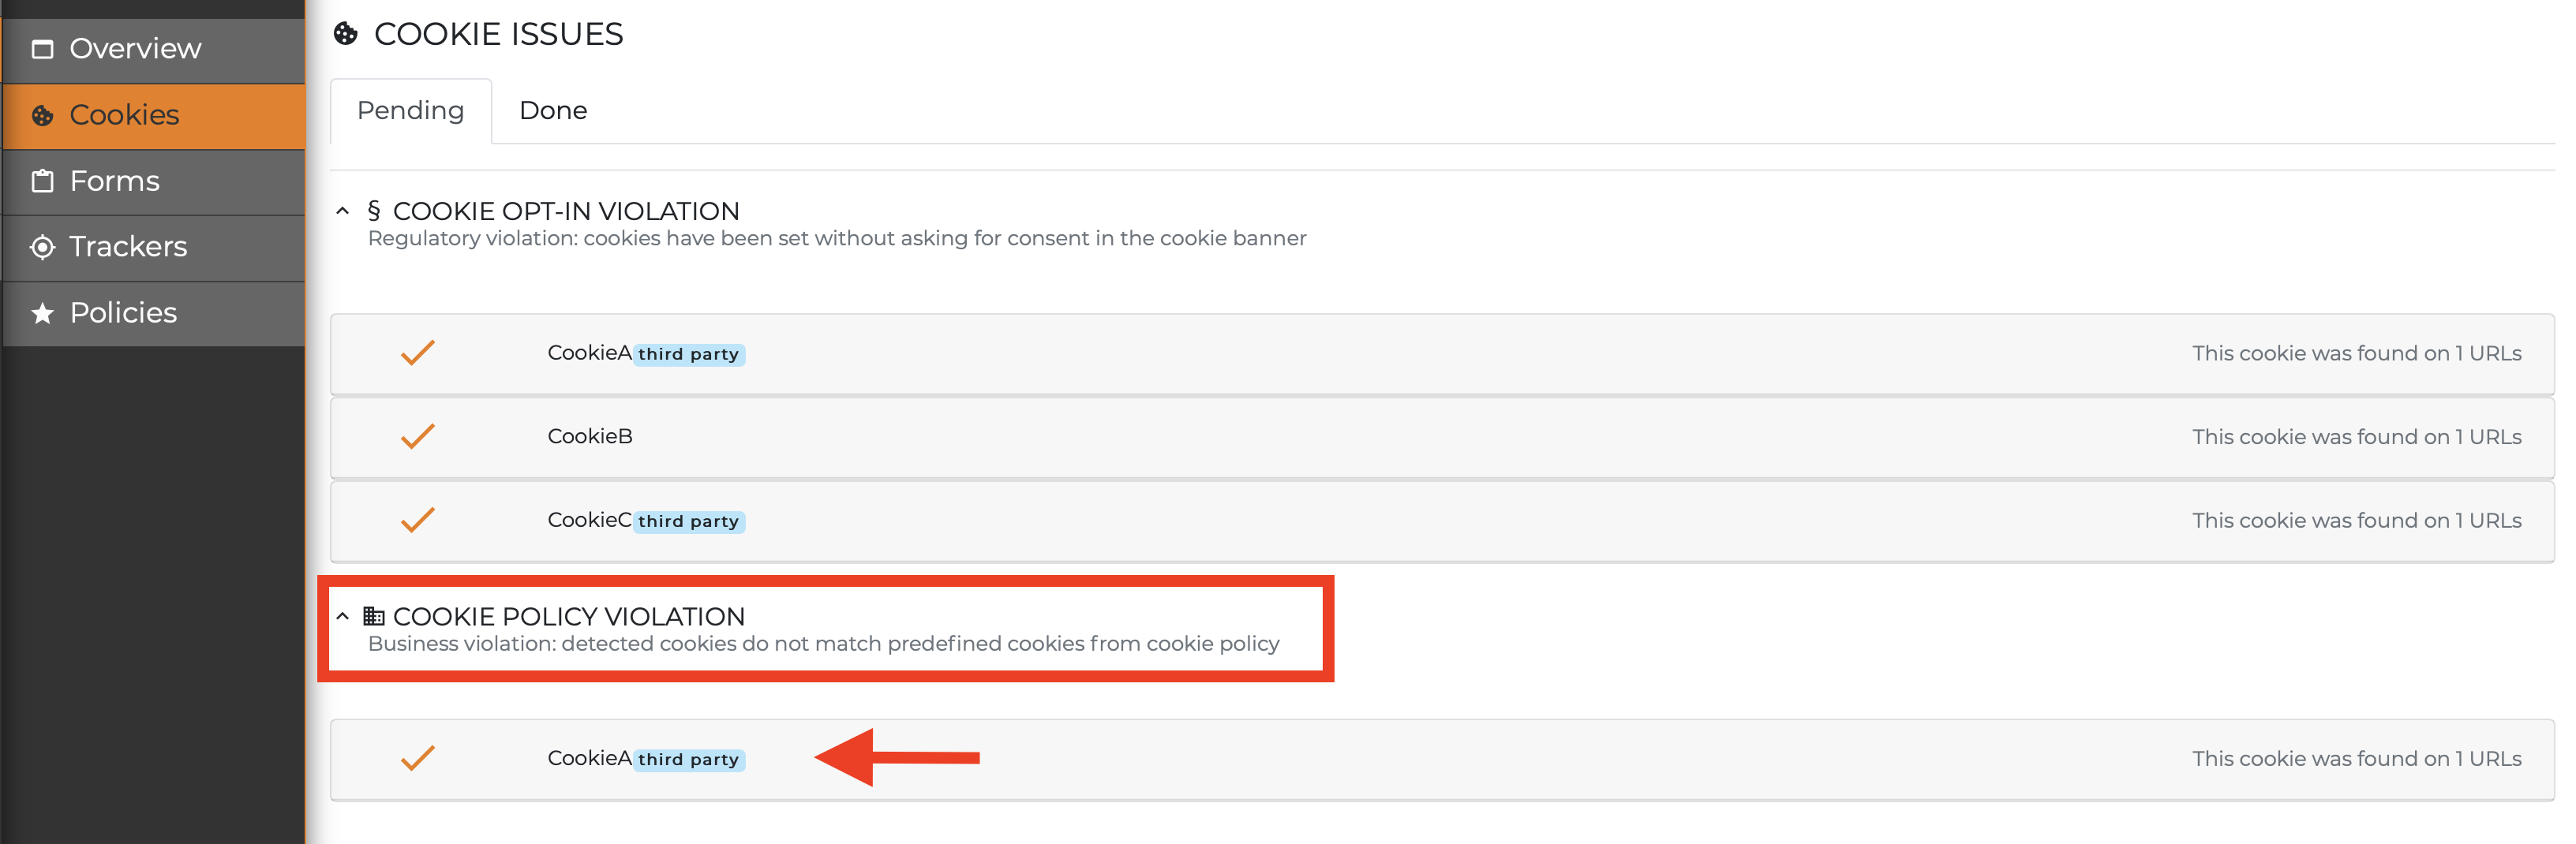
The first table (COOKIE OPT-IN VIOLATION) shows all cookies of the domain that were detected during the complaince scan. The second table (COOKIE POLICY VIOLATION) contains all cookies that were not defined in the cookie Whitelist. All those cookies should be checked if they are really needed. If yes, move them behind the cookie banner and define them in the cookie policy. If not, remove them from the web application.
Additionally, we have a default Cookie Whitelist in place for all of our customers. This default list includes common technical neccesary cookie names that do not represent a violation in the GDPR context (not all technical necessary cookie names included).
Forms (TBD)
Trackers (TBD)
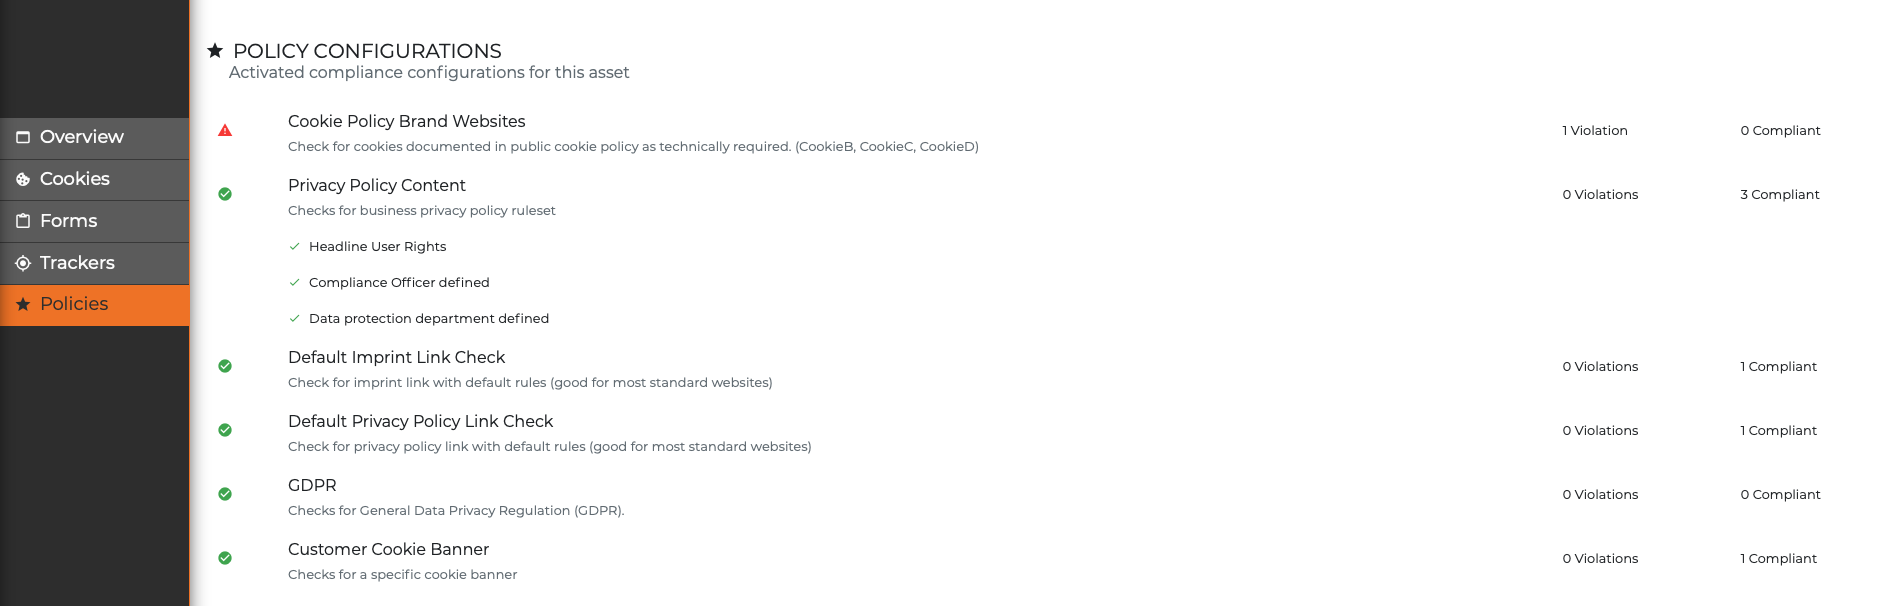
Policies
This type generally handles all content related checks. The customer has the possibility to define company related rules for all/parts of their own requirements.
For example, the management wants to see a specific privacy policy and imprint combination on all of their company websites. Those requirements will be converted in a customized rulset by the Nimbusec Service Team.
More examples:
- specific privacy policy / imprint link combinations in header and footer of a website
- specific text in privacy policy / imprint (old board members, specific topics, ...)
- specific company cookie banner
- specific imprint text
- ...
By clicking on the "Details" button in the compliance view, all defined polices can be seen.

POLICY CONFIGURATION detail view (example):
Security Header Ratings
Explanation
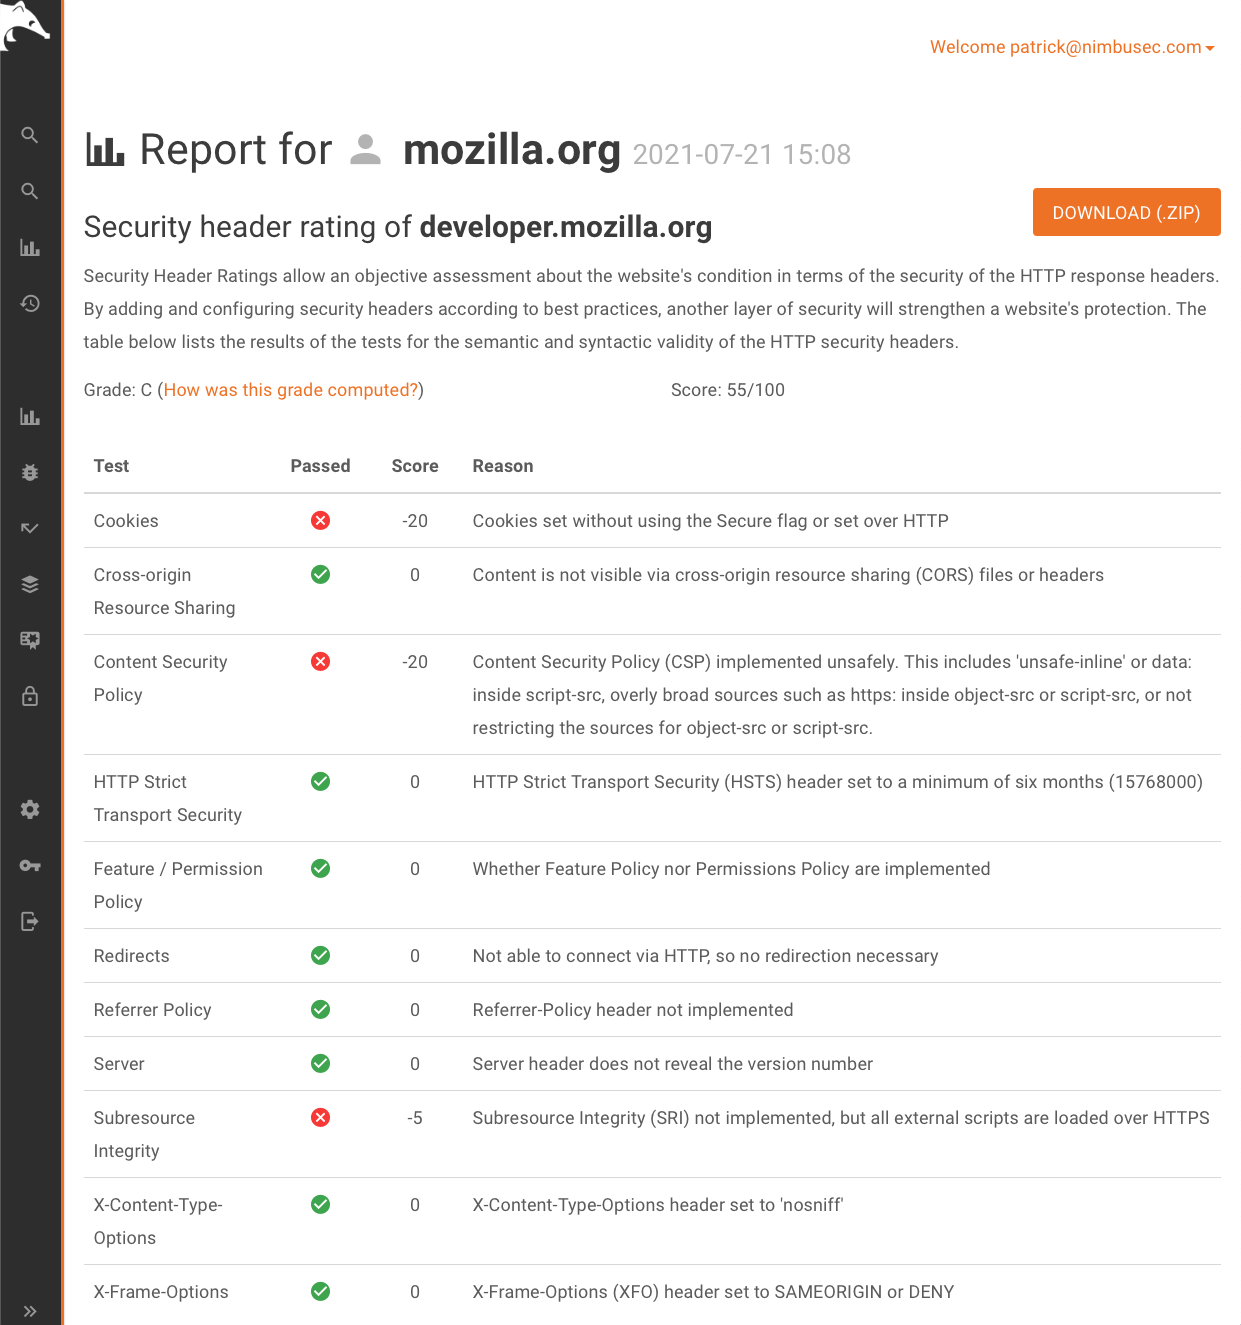
Security Header Ratings allow an objective assessment about the website's condition in terms of the security of the HTTP response headers. By adding and configuring security headers according to best practices, another layer of security will strengthen a website's protection. In Nimbusec Discovery, a new column within the report overview - consisting of grade A-F - evaluates the scanned security headers of a website.
The implementation is based on Mozilla Observatory. The detailed scoring is described in their Github repo: Scoring.md. That means we stick to Mozillas rating and scoring method.
Important update
Right now, Mozilla appears to be not that keen about keeping the project up-to-date with the current Security Header landscape. Meanwhile, several vendor have introduced new headers, altered the meaning of existing ones and even deprecated the use of some older headers which makes their consideration, evaluation and assessment of them in the Observatory project kinda obsolete. To adhere to the changes and hold our standards to the highest level, some important changes that can be seen below, were made.
Latest Changes
X-XSS Protection
Action
Removed from domain check
Reasoning
X-XSS Protection allows the user to activate the internal XSS Auditor / Filter which on behalf of the user conducts XSS checks for the given webcontent that served or presented. Back in the good old days of Internet Explorer this check was considered important to add another protection to the user. Nowadays, most major browser vendors (Chrome, Edge, Safari) have either retired or deprecated their XSS Auditors / Filters. Firefox, ironically, have never ever implemented such a check in the first place 1. The prevailing opinion is that this header has been completely replace by the superior Content Security Policy 2. Even OWASP does not recommend activating or enabling this header and advices turning it off 3. Currently, we do not grant any bonus points for having this header but rather penalize wrong or non - existant implementations. Given the current state, of major browser vendors, this header does not pose any usefulness any longer.
Sources
- https://developer.mozilla.org/en-US/docs/Web/HTTP/Headers/X-XSS-Protection
- https://scotthelme.co.uk/deprecating-xss-reports/
- https://github.com/mozilla/http-observatory/issues/432
HPKP = HTTP Public Key Pinning
Action
Removed from domain check
Reasoning
HPKP is an absolete header which is no longer supported by any web standards 1. It's original use was to pinpoint the public key of a website as a header when server via HTTPS. The reason was a protection against compromised CAs which would issue certificates for the same domain although it might belong to a completely different domain with malicious content behind. Although interesting when introduced in the 2010s, it became quickly a hot spot for misconfigurations and even counter-attacks. One immediate example is that browser were storing the pin of the public key for a pretty long time which meant that the certificate needn't to be changed. Which obviously contradicted short-lived certificates from Let's encrypt. As a result, many eager website maintainer found themselves very quickly in a position where the browsers stored and used primarily a pin for a certificate that had been obsolete. They were stuck. Other interesting examples are listed in 2. As of now, our implementation does not grant any bonus points while penalizing wrong configurations. It is listed as an active (but hardly addressed) issue in the Mozilla Github repository 3. Given the complete(!) deprecation of this header, it does not serve any purpose any longer.
Sources
- https://developer.mozilla.org/en-US/docs/Web/HTTP/Public_Key_Pinning
- https://scotthelme.co.uk/hpkp-is-no-more/
- https://github.com/mozilla/http-observatory/issues/422
Feature Policy / Permissions Policy
Action
Consider implementing this feature with only bonus points (+5 points) for correctly set headers (regardless of the actual feature that is restricted / allowed).
Reasoning
Feature Policy / Permission Policy is a header that was implemented around 2015 which allows the restriction of certain web features on a given page. Features include such things as notifications (like e.g.: when a website asks the user for permission to send notifications), camera, microphone, access to Payment Request API and the ability to make synchronous XML HTTP Requests among others. Crucially for the origin of this header is that the restriction can be extended to embedded pages as well, such as iFrames. This gives another layer of protection to the webpage developer as well as the visitor as malicious scripts that unintentionally happen to be embedded into the web page and attempt to access certain features are gonna be shut. Additionally, the web page developer can ensure that only those features are available that are truly needed. Given the current state-of-the-art browser landspace however, it is yet to be supported by Firefox and Safari. Chrome, Edge and Opera offer full support although the range of web features vary (please keep in mind that there are currently around 25ish web features that can be configured). Therefore, it is to be considered that we implemented bonus points (+5 points) for correctly setting this header, nothing more and nothing less.
Sources
- https://scotthelme.co.uk/a-new-security-header-feature-policy/
- https://w3c.github.io/webappsec-permissions-policy/
- https://developers.google.com/web/updates/2018/06/feature-policy
- https://developer.mozilla.org/en-US/docs/Web/HTTP/Headers/Feature-Policy#browser_compatibility
- https://scotthelme.co.uk/goodbye-feature-policy-and-hello-permissions-policy/
- https://github.com/mozilla/http-observatory/issues/361
- https://developer.mozilla.org/en-US/docs/Web/HTTP/Headers/Feature-Policy
Server
Action
Consider penalizing 5 points (-5) if the Server header in a HTTP response shows the version number.
Reasoning
The version number grants attackers that desire to hack the website additional information about the Server that is in use (e.g.: Nginx or Apache). Vulnerabilites targeted for specific version numbers can be search for directly on platforms like ExploitDB (not to mention that NIST or Mitre list the specific numbers for CVEs as well). Even the RFC describing the Server header mentions that web page revealing that version number are more likely to be targeted by attackers. As a result, it might be helpful to discourage the usage of the version number by penalizing such configurations.
Sources
- https://github.com/mozilla/http-observatory/issues/443
- https://scotthelme.co.uk/hardening-your-http-response-headers/#server
- https://securitytrails.com/blog/top-tips-harden-http-headers
- https://pretty-rfc.herokuapp.com/RFC2616#header.server
Other Changes
Action
Consider penalizing 5 points (-5) if the Server header in a HTTP response shows the version number.
Sources
- https://github.com/mozilla/http-observatory/pull/368
- https://github.com/mozilla/http-observatory/pull/437
- https://github.com/mozilla/http-observatory/pull/444
Scoring
Every scanned domain starts with a base score of 100. According to Mozilla's scoring method points are added for special configurations or subtracted if they are missing or insecure.
This generates a score which then can be mapped to a grade according to the following table:
| Scoring Range | Grade |
|---|---|
| 100+ | A+ |
| 90-99 | A |
| 85-89 | A- |
| 80-84 | B+ |
| 70-79 | B |
| 65-69 | B- |
| 60-64 | C+ |
| 50-59 | C |
| 45-49 | C- |
| 40-44 | D+ |
| 30-39 | D |
| 25-29 | D- |
| 0-24 | F |
Looks in Discovery
The new column in Discovery shows the Grade from A+ to F for every discovered domain, where a rating was possible.
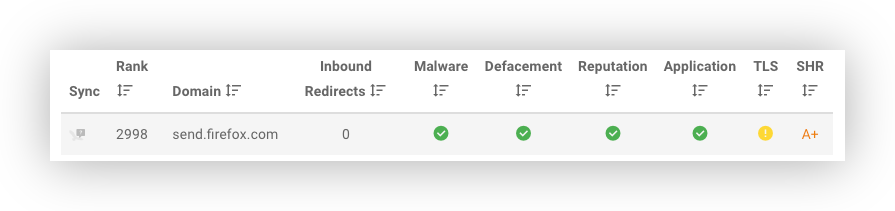 Clicking on the grade will show the details how we measured the rating. On the details page you will see the reached score and all factors used to calculate it.
On the new analysis page you can filter for websites passing and/or failing specific tests. That will help you to focus on the most important websites first.
Two factor authentication
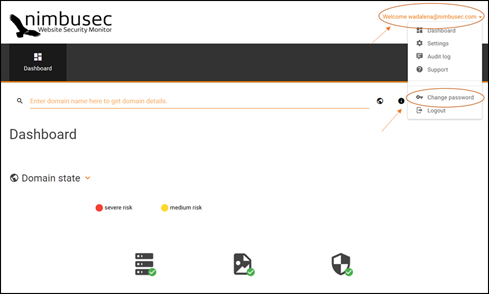
- First you have to click on your username in the top right corner and select the "Change password" function.

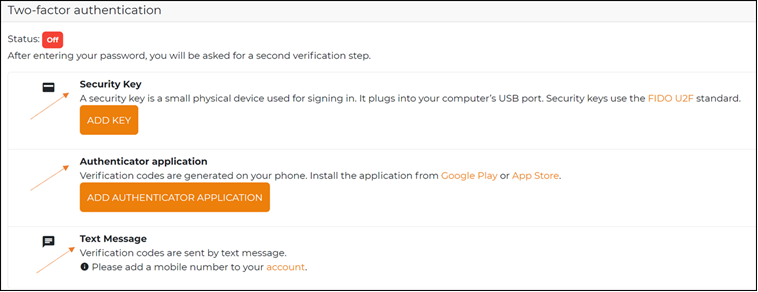
- Here you have the option to choose between 3 possibilities to activate the two-factor authentication.

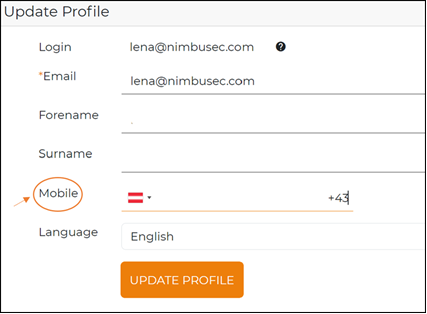
- If you want to choose option 3 “Text Message”, you have to deposit your phone number:
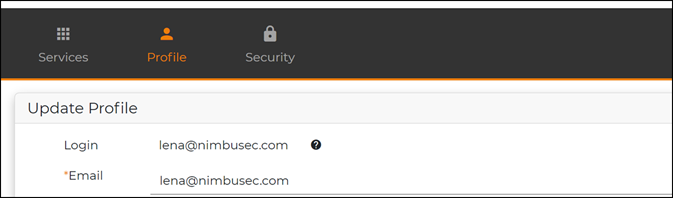
- Select Profile

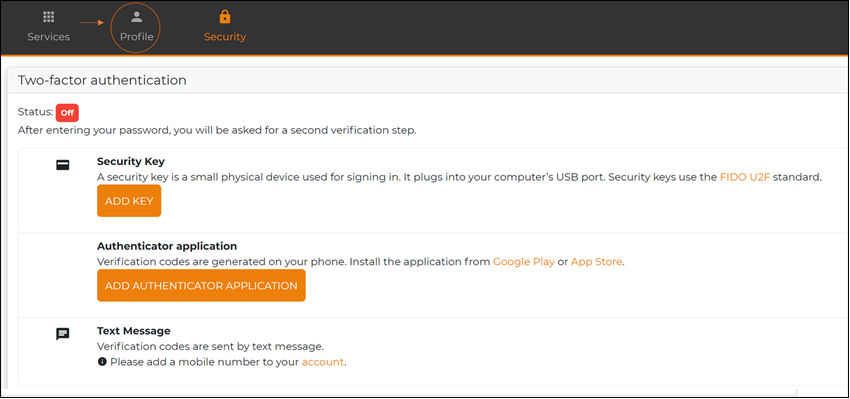
- Add your phone number to your profile

- Now you can choose the button “Security” and choose option 3 “Text Message”.

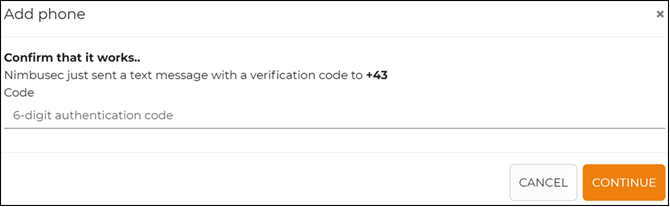
- After you selected the option “Text message” there is going to appear the following pop up. You are receiving a text message with a verification code.

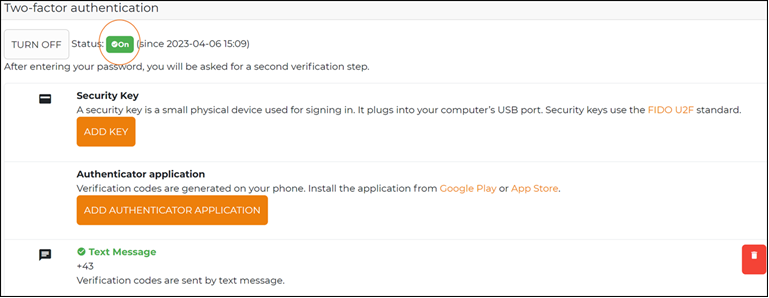
- Now you can see, that the status of the two- factor authentication is green and “On”.

- The other two options are self-explanatory.
Getting Started
What is Discovery?
Nimbusec Discovery's Mission
Nimbusec Discovery aims to identify all websites related to your organization and perform a passive security analysis by simulating one single website visitor per domain.
A Nimbusec Discovery report is an objective, external overview of your organization's global web presences with an IT-security focus. Such a report can be used for:
- security incident detection,
- risk evaluation,
- decision basis for subsequent continuous monitoring with Nimbusec Website Security Monitor.
- control for web application life-cycle management and penetration testing strategies.
Contrary to penetration testing tools, Nimbusec Discovery does not simulate attacks or any kind of brute force scans and does not represent a risk to live web-applications.
How is it done?
Nimbusec Discovery finds domains based on public WHOIS information and public search engine results. After Discovery discovered all domains, a passive security analysis is performed. This analysis includes actual security incidents like malware distribution, defacements and reputation issues. However, Nimbusec Discovery also detects preventive risk factors like outdated and vulnerable applications and problems with your website encryption.
Nimbusec Discovery only focuses on the initial landing page and does not analyze the entire website.
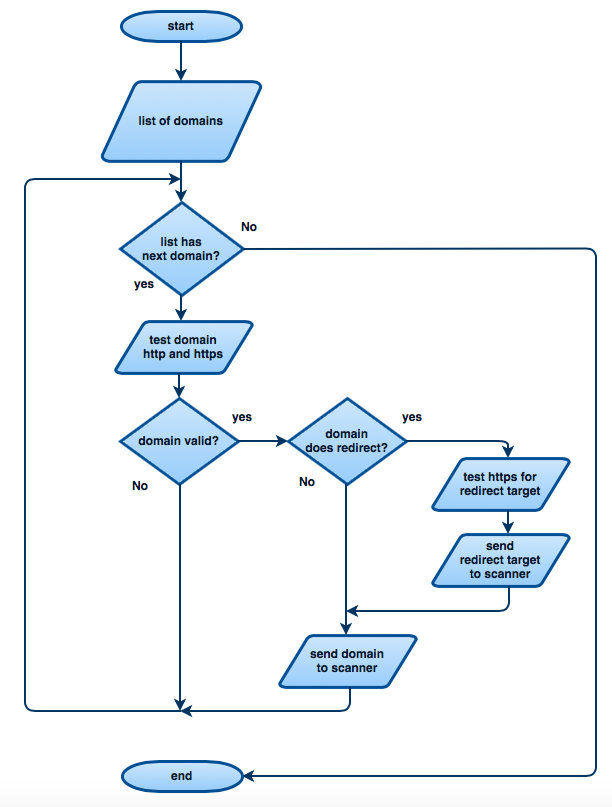
Tech talk.
Technical speaking, Nimbusec Discovery transmits 3 HTTP requests per FQDN (fully qualified domain name) to the webserver.
- HTTP request #1: Determine if page is accessible via HTTP.
- HTTP request #2: Determine if page is accessible via HTTPS and check certificate if available.
- HTTP request #3: Simulates one real website visitor that renders the entire website and downloads all linked resources. There are no additional clicks simulated after rendering the initial landing page.
Redirects
Very often an identified domain redirects to another (sub)domain. Nimbusec Discovery follows such redirects and eventually only scans the final redirect-chain target.
Example
http://example.com redirects to https://www.example.com
input is example.com
- 1st req. --> try https://example.com (connection fail)
- 2nd req. --> try http://example.com (connection success, status 301 redirect www.example.com)
- 3rd req. --> try https://www.example.com (connection success, status 200)
- 4th req. --> scan https://www.example.com (connection success, status 200).
The first 3 requests are comparable to a ping and do not download any additional resources or scripts. They only check whether the request is successful or not.
The 4th request then simulates one real website visitor and performs the analysis.
What is Nimbusec?
Nimbusec is a website security monitoring tool that notifies you, when your website was hacked or is in danger.
It allows you to react before your customers or your reputation are harmed.
- Safe: Nimbusec never exposes data of your servers to the cloud, respecting European Data Security Laws
- Fast: Depending on your plan you know what happened in minutes
Nimbusec also features:
- Notifications per mail and text messaging
- API for deep integration (SIEM, Ticketing Systems, Automated reactions)
- Plesk Panel Integration: Nimbusec Webhosting Security on Plesk Marketplace
Understand Nimbusec Results And Alerts
Alert actions
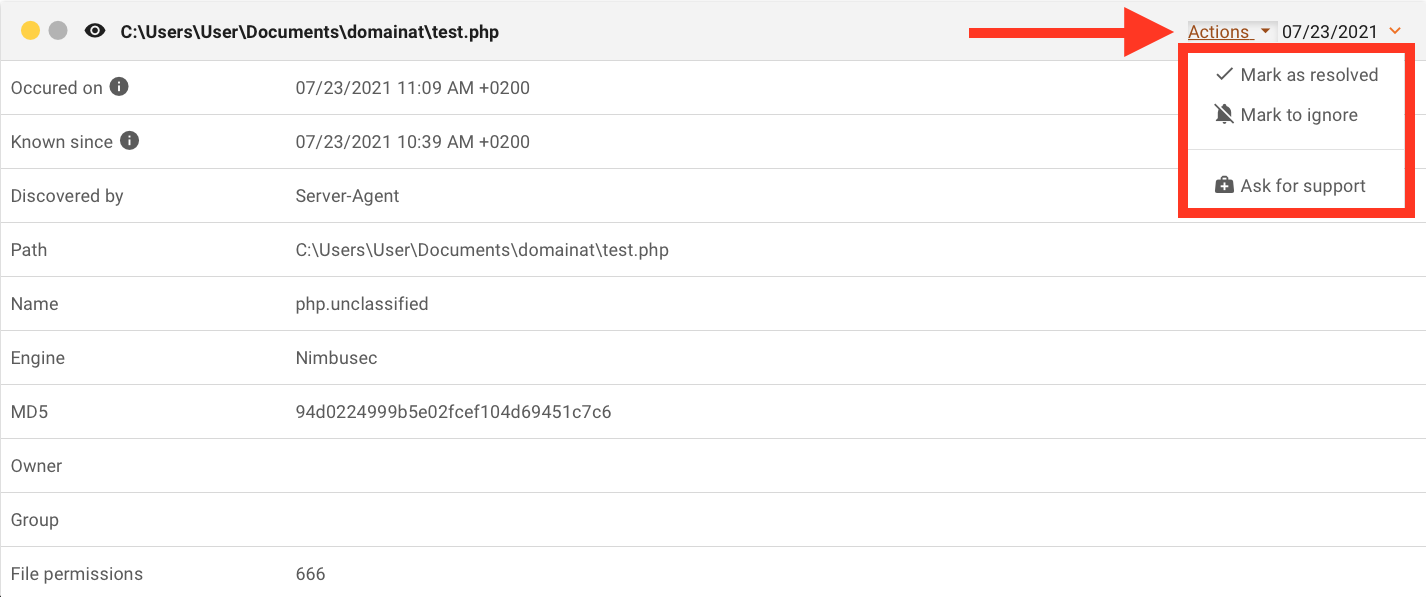
Each alert offers the user the ability to perform three different actions:
- Mark as resolved
- Mark to ignore
- Ask for support
To trigger one of those actions, click on "Actions" on the top right corner of the relevant issue.
Mark as resolved
When an alert is "marked as resolved", the alert is hidden from the domain details view. If Nimbusec detects the same kind of alert again on your domain, it will generate a new alert and notification.
Use this action if you solved an issue and want to remove it from the list of alerts in Nimbusec.
The user has the possibility to add a comment to document this action.
Mark to ignore
When an alert is "marked as ignored", the alert is hidden from the domain details view. It also hides any alerts that are equivalent. If Nimbusec detects the same kind of alert again on your domain, it will not generate any new alert or notifications.
Use this action if you or your security policy assigned a different risk level to a certain kind of alert that Nimbusec provides.
The user has the possibility to add a comment to document this action.
Ask for support
Blacklist alerts
Blacklists are lists of internet addresses that are known for security problems. These lists are maintained by organisations like Google, cybersecurity companies or non-profits who try to warn about "black sheep" within the online community. There are two ways your website can end up on such a list:
- Your website poses a risk to its visitors. Nimbusec calls this a "blacklist result"
- Your website links to another website that poses a risk to its visitors. Nimbusec calls this a "suspicious link result".
Blacklist Result
Definition
The monitored domain has been found on a blacklist.
How is it detected
Nimbusec external scan checks a domain's reputation on multiple blacklists. If the domain shows up on a blacklist an alert is generated. Blacklist alerts always refer to the main domain Nimbusec is monitoring.
Alert levels
- RED: Domain is currently listed on a blacklist
- YELLOW: Domain is listed on a blacklist which gets its results from communities (e.g. Web of Trust)
Recommended action
Click "Additional Information" to access the blacklist's main portal to find out why your website has been listed. The blacklists description gives usually a good reason and at least is a starting point to fix the problem that led to blacklisting. Follow the individual blacklist's process to remove your domain from the list (rescan) and repair its online reputation.
Suspicious Link Result
Definition
The monitored domain includes external links that have been found on a blacklist.
How is it detected
Nimbusec Cloud Scan checks every external link's reputation on multiple blacklists. If an external linked domain shows up on a blacklist a "suspicious link" alert is generated.
Alert levels
- YELLOW: An external link shows up on a blacklist
Recommended action
Check directly on the blacklist's portal why the external link ("Reason") has been listed. Remove the link unless the external link is under your control. In this case, follow recommended actions of "Blacklist Alert".
Content alerts
Defacement
Websites are the most public representation of any modern enterprise. This combination of high publicity with complex technology makes websites a prime target for political hacktivists who aim to embarrass a company and cause as much damage as possible.
Website defacements therefore “consist of hacking into a web server and replacing a web page with a new page bearing some sort of message.”
[Samuel, A. W. (2004). Hacktivism and the future of political participation, Harvard University, Cambridge, Massachusetts, p.8]
Technology-enabled political activism is often driven by major international and social disputes. These disputes are reflected in defacement waves that target a similar group of websites and communicate similar messages.
Examples for such “hacktivism” waves are:
- Anonymous with changing targets since 2003
- Syrian Electronic Army with pro-Assad messages aimed at new outlets, universities
- ISIS mass defacements in 2015
Our goal is zero false positives. Because of the advanced methods used here, we cannot guarantee 100% detection of a defacement, but we see the changes and tell if they are really suspicious.
Definition
A Nimbusec defacement alarm is defined by the following conditions:
- The visual appearance of a website was changed to distribute social, political or just for fun messages to the visitor.
- The website was changed in a way that the visitor will easily distinguish it from an official change. As a result, the main context of the website was replaced.
- The definition of a defacement is way to unspecific. @Nimbusec, we also differentiate between a phishing attempt (placing links on the website) and a defacement like defined above. You can find phishing attempts by the suspicious link alarm event (see blacklist category)
How is it detected
Nimbusec detects defacements typically from external, by its Cloud Scan.
Basically this is a fast approach that may detect defacements by signatures. Therefore the content of a website is extracted (plain text without tags and attributes). This content is then matched against an increasing set of rules which represent the content of typically seen defacements. Included are also bad words in multiple variations e.g. hacked by | h4cked | h4ck3d!!! | ...
To sum it up:
- Content is matched on rules, representing typical defacements
- Bad words are looked up in the content
We also gather data from external threat intelligence services. Defacement alarms are directly created from those data sources and are also used to write new signatures to improve the overall detection rate.
Alert levels
- RED: Identification of known defacement based on defacement signature.
- YELLOW: Possible defacement warnings detected by our external threat intelligence services that are not confirmed yet.
Red Alert
On red alerts a defacement was seen based on signatures. This can be held as defacements similar to the detection rate of anti virus products and should be taken really seriously. Automated reaction can be considered.
Yellow Alert
These alerts have to be taken serious as well, but we recommend to have a look at the page and verify the issue yourself.
Recommended action
The defacement result detail gives you a lot of information and has in mind to give you on first sight what went wrong.
Also screenshots of the landing page are rendered to see what our crawlers saw at the time of the scan.
The content result gives you the following information:
- Occured on: the time of the detection
- Reason: Description of the modules which voted for this issue
- Region: the region where the scan was performed from
- Viewport: a mobile or desktop browser client setting can be used
- Path: URL to the page/resource where the change was seen
- Change: Usually for this issue --> Defacement detected
- Name: Name of the defacement, if we have one (e.g. Hacker group). So you can identify the defacement better.
Try to verify the result by browsing the path, shown in the result. Request the website directly and also over a search engine. You may get different results. Do this only from a secure environment, as defaced websites are also likely to spread malware!
In case the website got defaced, and you don't have a incident response chain yourself, we prepared a short guide here.
- It is always good to create a backup of the webspace before changing anything.
- Redirect to a maintainance page, or in worst case to just a blank page, to not bring site visitors to danger.
- Investigate to find the weak spot (Outdated CMS or other application, some plugin, .. )
- Fix the vulnerabilities and remove evidence
The detected change might have been part of a major, but intentional content change. Contact the website's administrator for information.
When to mark as False Positive
If no problem shows and you are certain that no defacement took place, mark the alert as "false positive". This will create a rule that should prevent such alerts in the future. But every content is different and therefore hard to compare and analyse - If you have a specific alert that shows up unless you marked it as false positive, please contact us and we will work out a solution.
If you need in depth information about why this alert was generated, please contact nimbusec support.
Fading out results
An issue will be faded out when it is not seen again in between 2 weeks. This keeps your domain dashboard clean.
Server side alerts
Malware
Definition
Malware is short for "malicious software". In Nimbusec, malware usually refers to viruses, worms, trojan horses, Java script exploits and many other types of software that aim to compromise a website visitor's computer.
How is it detected
When Nimbusec visits a website, all data received is analysed with multiple commercial and open source anti virus engines. If any of those engines report suspicious data, Nimbusec raises an alert.
Alert levels
- RED: Identification of known malware based on signature
- YELLOW: Identification of unknown malware based on behavior analysis or open source antivirus engine.
Recommended action
Act fast! Your website visitors are being attacked right now. This represents a major legal and reputational risk for you. Please consider to put your website into maintenance mode right away. Nevertheless, before attempting to clean up your site: Backup your entire webspace and database. Determine what part of your website was responsible for distributing malware. Often malware is distributed through advertisement banners, javascript attacks or compromised downloads. Nimbusec will tell the URL of detected malware. Use this as starting point for your analysis. If you cannot determine the problem yourself, ask an IT forensics expert for help. You can find additional information at (StopBadWare.org)https://www.stopbadware.org/my-site-has-badware
Webshell
Definition
A webshell is a script that can be uploaded to a web server to enable remote administration of the machine. Webshells are usually found by Nimbusec's Server Agent. This result is in many ways similiar to the Malware result type, except that it contains more information and it's paths are file paths. You can find more information about webshells at the (US CERT)https://www.us-cert.gov/ncas/alerts/TA15-314A
How is it detected
- Nimbusec Server Agent analyse source files based on behaviour patters and signature database or
- Nimbusec External Scan analyse public files based on antivirus engines, behaviour patters and signature database
Alert levels
- RED: Identification of known malware/webshells based on signature
- YELLOW: Identification of unknown malware/webshells based on behavior analysis
Recommended action
Webshells often stay inactive for weeks before they create damage. Even so, they are usually able to deface a website completely or abuse your webserver's ressources. Before attempting to clean up your site: Backup your entire webspace and database. Investigate the indicated file, related log-entries and remove malicious code. Start forensic analysis for vulnerabilities that allowed malware to be placed based on file meta-data and log entries. Often outdated web applications (e.g. CMS systems) are exploited for malware placement.
Configuration
TLS
Definition
We perform several checks on the TLS protocol and certificates to ensure the traffic to the website is really secure. Checks:
- Certificate expiring date: We check the expiring date of a certificate and warn before it will expire and create warnings for customers or breaks tools relying on that certificate.
- Certificate expired: Worst case, but happening. If a certificate expired already we notice that.
- Unsafe ciphers: based on recommendations of international security companies
- Insecure protocol usage
Details on specifics like ciphers can be found in our FAQ section here.
How is it detected
It is detected via the nimbusec Cloud Scan.
Alert levels
- RED: An unsafe configuration was detected and should be handled immediately.
- YELLOW: Whatever it is, it can cause trouble in the near future and should be considered to be fixed soon.
Recommended action
Update, renew your TLS certificate if it is about to expire or allows use of unsafe configuration. Update server configuration if possible to e.g. SSL/TLS Deployment Best Practices.
Application
Definition
This scan tries to detect installed applications, content management systems (CMS), webservers and used software. This information, a large knowledge base on software versions and Common Vulnerabilities and Exploits (CVE) databases is used to give information about possible vulnerable and exploitable software on a webserver through a website and if software, especially CMS is outdated and in need of an update.
How is it detected
- Nimbusec Server Agent detects the five most used CMS in any version.
- Nimbusec Cloud Scan tries to detect any application visible from the outside.
Alert levels
- RED: Software was found which is potentially attackable. This means a CVE is known with a high rating or a public available exploit.
- YELLOW: Outdated software was found, as well as low public CVE entries.
Recommended action
In case of an outdated and vulnerable software, update it to the most recent version.
- Delete plugins and themes that are not needed
- Update always to the most recent version to fix vulnerabilities
- Care about safe passwords and
- Access permissions to your systems
Sometimes an update cannot be performed. On first sight that is not a problem, just have a closer look at the specific website. Maybe the software vendor has patches for this specific version to fix some security flaws. At least monitoring can be upgraded to a faster interval, in case something happens, the first one to know is the website owner.
Downloadable Sources
Definition
Downloadable software is suspected to be accessible from the outside and may contain passwords or other confidential information that can be used to compromise the webserver or to make a public statement or to leak information. This can be for example:
- forgotten database dumps (db.dmp, mysql.bkp, ... )
- temporary configuration files (configuration.php.tmp, config.php.sample, ... )
How is it detected
It is detected via the Nimbusec Server Agent.
Alert levels
- YELLOW: We found suspicious files, but did not check availability from external yet.
Recommended action
Find the file on the server and find out if it is accessible from external. If it is needed by the underlying software and contains critical data, you may can modify the access permissions (.htaccess, Linux permissions, ACL, ... ). If it is not needed there, move or delete it.
It may be an automated backup of something by a plugin or other software. Try to configure it to store the backup in a place that is not accessible by anyone.
Reputation Alerts
Suspicious Redirects
What is it?
A suspicious redirect is a redirect that has changed. Redirects are tracked with each scan, and if the redirect chain changes e.g. to a malicious website, or doesn't match the expected pattern a warning for suspicious behavior is thrown.
Where is it detected?
- Website Security Monitor
Alert Levels
- YELLOW: redirects may not be triggered on any visit, they might also be set on purpose by the web administrator.
Recommended Action
Check if the redirect is leading to the correct target. If the target is known as malicious, remove the redirect if possible immediately.
DNS Takeover
What is it?
A potential DNS takeover vulnerability was found. This means that an attacker may take control of a DNS server for resolving your hostname. The attacker can change the DNS record(s) to a server that he/she owns.
This issue type results from a misconfigured server. Domain's DNS records are controlled by DNS servers that anyone can use, but no one within this service claims the domain.
To perform a takeover, the name server has to be one of the currently known vulnerable DNS services that can be found here:
https://github.com/indianajson/can-i-take-over-dns?ref=blog.projectdiscovery.io
Where is it detected?
- Website Security Monitor
Alert Levels
- YELLOW: A potential DNS takeover vulnerability was found in the DNS configuration of your scanned website.
Recommended Action
For more information, please check the following article:
https://blog.projectdiscovery.io/guide-to-dns-takeovers/
Issue and Event overview
Nimbusec Website Security Monitor
Issue Types 2022
|
Category |
Issue Types | Descritpion |
|
Malware |
Malware | Malicious code fragments are found on a Web page. Typical examples would be, amongst others, credit card skimmers, crypto miners or tech scams. |
| SEO-Spam | If changes on a website are detected while acting as 'googlebot' instead of the default browser agent a warning for suspicious behavior is thrown | |
| Defacement | Defacement | The visual appearance of a website was changed to distribute social, political or just for fun messages to the visitor |
| Content Violation | Changes of the content of a Web page are detected. These change may be intended by the website owner or may be the result of a malicious attack. However, Nimbusec does not distinguish between legitimate and malicious changes. | |
| Reputation | Blacklist | The domain which is subject to review is found on blacklists monitored by Nimbusec |
| Suspicious Link | Suspicious resources, based on blacklists monitored by Nimbusec, are embedded (but not loaded) on a Web page. A typical example of this type of event would be a link (a-tag) which points to a suspicious domain found in the Nimbusec blacklist. | |
| Suspicious Request | A suspicious resource, based on blacklists monitored by Nimbusec, is actively loaded by a Web page. A typical example of this type of event would be a JavaScript source which points to a suspicions domain. | |
| Webshell | Webshell | Malicious code fragments are found in files monitored by Nimbusec's Server Agent. As files are directly inspected on the Web server additional malicious code such as Webshells may be detected. |
| Application | Vulnerable | An application with a possible vulnerability has been found on a website |
| CMS Tampered | Core file of WordPress change and are only generated by Nimbusec's server agent. However, Nimbusec cannot not distinguish between legitimate and malicious changes. | |
| Outdated | An outdated application has been found on a website | |
| TLS | TLS Expires | The TLS certificate will expire soon |
| TLS Notrust | Untrusted root certificate | |
| TLS Protocol | Unsafe TLS protocol allowed in configuration | |
| TLS Sigalg | Bad signature algorithm | |
| TLS Ciphersuite | Unsafe TLS cipher allowed in configuration | |
| TLS Hostname | Hostname does not match certificate | |
| TLS Legacy | Symantec legacy certificate in use | |
| TLS Misconfigured Chain | The received certificate chain was incomplete or misconfigured | |
| TLS No Https redirect | HTTP website does not redirect to HTTPS | |
| TLS Revoked Cert | The certificate was revoked by the owner | |
| Configuration | Baseline Empty | Wrong Agent configuration: empty result |
Nimbusec Website Security Monitor Issue Types 2026
| MALWARE | WEB SHELL | APPLICATION | TLS | CONTENT | BLACKLIST | |
| CONFIG |
|
Malware
| Name | Event | Description |
| Malware | malware | Malicious code fragments are found on a Web page. Typical examples would be, amongst others, credit card skimmers, crypto miners or tech scams. |
| SEO-Spam | seospam | If changes on a website are detected while acting as 'googlebot' instead of the default browser agent a warning for suspicious behavior is created |
Web Shell
| Web Shell | webshell |
Malicious code patterns are found in source files based on behaviour patters and signature database of the Nimbusec server agent |
Application
| Outdated Application | cms-version | An application running on an outdated verrsion has been found on the website |
| Vulnerable Application | cms-vulnerable | An application with a possible vulnerability has been found on the website |
| CMS Tampered | cms-tampered | Core file of WordPress change and are only generated by Nimbusec's server agent. However, Nimbusec cannot not distinguish between legitimate and malicious changes. |
TLS
| TLS Protocol | tls-protocol | Unsafe TLS protocol allowed in configuration |
| TLS Ciphersuite | tls-ciphersuite | Unsafe TLS cipher allowed in configuration |
| TLS Sigalg | tls-sigalg | Outdated hash algorithm was used in the creation of the certificate |
| TLS Notrust | tls-notrust | Untrasted root certificate |
| TLS Hostname | tls-hostname | Hostname or alternative name does not match the certificate |
| TLS Expires | tls-expires | The TLS certificate will expire soon or has already expired |
| TLS Legacy | tls-legacy | Symantec legacy certificate in use |
| TLS Misconfigured Chain | tls-misconfigured-chain | The received certificate chain was incomplete or misconfigured |
| TLS Revoked Cert | tls-revoked-cert | The certificate was revoked |
| No HTTPS Redirect | no-https-redirect | HTTP website does not redirect to HTTPS |
Content
| Defacement | defacement | The visual appearance of a website was changed to distribute social, political or just for fun messages to the visitor |
| Content Violation | content-violation | Changes of the content of a Web page are detected. These change may be intended by the website owner or may be the result of a malicious attack. However, Nimbusec does not distinguish between legitimate and malicious changes. |
Blacklist
| Blacklist | blacklist | The domain which is subject to review is found on blacklists monitored by Nimbusec |
Reputation
| Suspicious Link | suspicious-link-v2 | Suspicious resources, based on blacklists monitored by Nimbusec, are embedded (but not loaded) on a Web page. A typical example of this type of event would be a link (a-tag) which points to a suspicious domain found in the Nimbusec blacklist. |
| Suspicious Request | suspicious-request | A suspicious resource, based on blacklists monitored by Nimbusec, is actively loaded by a Web page. A typical example of this type of event would be a JavaScript source which points to a suspicions domain. |
Configuration
| opendir | config-opendir | When a web server’s directory listing is enabled, anyone can browse the contents of folders (e.g., `/files/`) instead of being restricted to specific pages. |
| php Error | config-phperror | When PHP error messages are shown directly to users instead of being logged securely. |
| public config | config-public | Apache status pages are checked for public accesibillity. |
| Security Header config | config-secheads |
Will be shown if SHR rating is grade "D" or lower. |
| Deprecated Header | config-header-deprecated |
The server uses outdated headers that are no longer recommended. They should be replaced with modern alternatives for better security and compatibility. |
Text
| SRI Missing | sri-missing | No integrity hash is defined for the external resource. |
| SRI Invalid | sri-invalid | The provided hash does not match the actual content of the loaded file. |
| Hijack Link | hijack-link | The destination domain of the link is not (or no longer) registered. Attackers can register this address to redirect users to malicious or phishing content. |
| Hijack Resource | hijack-resource | The source domain of the resource is not registered. A third party can claim the domain to inject malicious scripts or assets directly into the website. |
Configuration Alerts
Open Directory (opendir)
What is it
A web server misconfiguration that allows visitors to browse directory contents (e.g., /files/) instead of being restricted to specific web pages.
How is it detected
Nimbusec searches for file directory listing when visiting webpage.
Alert levels
YELLOW – Can expose sensitive files and aid in targeted attacks.
Recommended action
-
Disable directory listing.
-
Store sensitive files outside web-accessible directories.
-
Conduct regular audits of file paths exposed to the internet.
PHP Error Display
What is it
When PHP error messages are displayed directly in the browser instead of being hidden and logged securely.
How is it detected
Nimbusec searches for php error message when visiting webpage.
Alert levels
YELLOW – Reveals internal system details (file paths, queries, API keys) that attackers can exploit.
Recommended action
-
Disable
display_errorsin production environments. -
Log errors to a secure server or file instead of displaying them publicly.
-
Implement custom error pages for users.
-
Regularly review logs for abnormal or repeated errors.
Public Config
What is it
Apache status pages are checked for public access without authentication.
How is it detected
Nimbusec checks /server-info /server-status for public accessibility
Alert levels
YELLOW – Reveals internal system details, which can lead to different attack vectors.
Recommended action
- Apply “private by default” permissions to all storage resources.
- Use encryption and authentication for all sensitive files.
- Enable monitoring for unauthorized public access changes.
Security Header Config
What is it
Missing or misconfigured HTTP response headers that strengthen browser-level protections against attacks.
Occures when SHR grade is lower than "D".
How is it detected
Nimbusec calculates a grade from A to F for the Security Headers of scanned domains based on Mozilla Observatory.
Common headers include CSP, HSTS, X-Frame-Options, and X-Content-Type-Options.
Alert levels
- YELLOW – Increases exposure to XSS, clickjacking, and MITM attacks.
Recommended action
- Add and properly configure key security headers.
- Follow OWASP Secure Headers Project guidelines.
- Review headers after web server or app updates.
Guides
Incident Response - Website Cleanup
Table of Contents
About
It may happen that your website got hacked - spreads malicious files or was defaced or is suddenly blacklisted. This guide tells you the steps what you should do to get your systems up and running again and also support investigations.
Step 1 - Backup
Backup your files - with timestamps. This makes it a lot easier afterwards to find out what happened. Everything saved in the archive can be shared for further investigations.
# archive everything
tar -zcvf /PATH/TO/WEBSPACE/ARCHIVE.tar.gz /PATH/TO/WEBSPACE
Step 2 - Find infected
If one malicious file is found, the chance is high that more files were affected at the same time. They often hide, but it is not impossible to find them following the next few abstracts.
By Date
To find all modified files in a specific timeframe you can use find command. Choose a time surrounding the hacked file modified/created time.
# find files modified at a specific date
find . -type f -newermt 2015-02-26 ! -newermt 2015-02-27
By Originals
Check the files against their original counterparts. Injections are placed in random files of your webspace. In Step 1 you have created a file with MD5s of your files. Now it is about comparison:
- Download or locate the files of the original CMS
- Change into the directory of the CMS
- Use for example
md5deepto create md5 hashesmd5deep -r -l * > ~/cms-versions/<cmsname>-<version>.md5
- Now change to your webspace directory
- Compare it with
md5summd5sum -c --quiet ~/cms-versions/<cmsname>-<version>.md5
You will receive the modified files and new ones which don't match. It will be good to have a look at the modified ones and replace them with the originals if needed.
Access Logs
If you have logfiles of your webserver, have a look at them. Filter the webspace/website requests and have a look at the time when the hacked file(s) were first detected.
What is of interest there: POST requests to your website, or specific files on your webspace can give you a hint where executable code is hidden.
Step 3 - Clean
There are at least 3 approaches to finally clean successfully a webspace.
Total Zen: This is most likely the hardest step, but possibly the most effective. Start from scratch, wipe the whole webspace directory and copy over only:
- Install a new CMS (use the most current version)
- Add additional files required to run your website (e.g. images, css styles, javascripts)
- Only install needed Plugins
Classic Cleanup: This approach makes use of the information you gathered before. Delete or replace all files that you encountered as malicious previously. If the file was injected with malware, and it is needed by the CMS you use, replace it with its original.
Backup: Simple and fast, yet effective. Restore your webspace with a backup you know that it is clean.
!!! Be warned for the last 2 approaches: The cause of the hack is probably not fixed with the removal of malicious files. To get a little on the secure side try at least the following:
- If possibly update your CMS
- Also consider plugins and themes
- Remove plugins and themes you don't use (anymore)
- Update your server infrastructure if possible
- Database
- PHP, Java, ...
- Webserver (Apache, nginx, ...)
- Change passwords for FTP, DB, CMS-Logins
Step 4 - Monitor
When your website is clean again, keep an eye on it for the next few days to a week. You will maybe want to watch the request/access logs. Especially
- POST requests to your website
- File count
- Modified files
Sync domains in a hosting environment automatically
Use Case:
If you are a hoster you probably want to synchronize available domains with nimbusec automatically.
Tools to use:
- nimbusec sync-domains script
- nimbusec create-agent-configuration script
Steps:
- Download the nimbusec agent from the nimbuse portal https://portal.nimbusec.com/einstellungen/serveragent
- Download and build the hoster-tools scripts from nimbusecs Github account https://github.com/cumulodev/hoster-tools
- Create a script which fetches all available active domains of a server
- Create a script that combines the process of
- fetching all active domains (your script)
- create nimbusec agent configuration, and save it to the right place (nimbusec create-agent-configuration script)
- sync domains by adding new ones, delete removed/inactive (nimbusec sync-domains script)
- log differences
Integration Projects
Nimbusec WSM - Available Data
This page provides an overview of available data fields that can (partly already, partly to be implemented if required) passed on via our custom integrations within Website Security Monitor.
Current Webhook Format
Customer
| id | Identifier to query additional user data |
| customer_id | Identifier to query additional tenant data |
| login | Username |
Domain
| id | Identifier to query additional domain data |
| bundle |
Identifier of the active bundle (package) defining the scan features |
| name |
Domain Name |
| url |
Full URI that is used for scanning |
| responseIP |
IP-Address that was recorded for the last scan. |
Issues (Array)
| id | Identifier to query additional issue data |
| domain | Identifier of the referenced domain |
| regions | List of regions through in which this issue occurred (possible values: EU, US, ASIA) |
| viewports | List of browser formats in which the issue occurred (possible values: mobile, desktop) |
| status | Display Status of the issue (possible values: pending, acknowledged, ignored) |
| event | Short name of the detected issue (e.g. malware, blacklist,...) |
| category | Overarching collection of events (e.g. content, reputation, ...) |
| severity | Numeric representation of the severity of an issue (1 = warning, 2 = alert) |
| firstSeen | Date and time on which the issue was first detected |
| lastSeen | Date and time on which the issue was detected most recently |
| details | See below. Each Issue has one of the following Details objects |
Details
Application Outdated
| name | Display name of the detected application |
| product | Canonical product name of the detected application the the version and vuln DB |
| url | Base URI where the application was detected (if detected by cloud scan) |
| path | Server-Path where the application was detected (if detected by server agent) |
| version | Detected version of the application |
| latestVersion | The latest version or latest stable Branch version (if applicable) |
Application Vulnerable
| name | Display name of the detected application |
| url | Base URI where the application was detected (if detected by cloud scan) |
| path | Server-Path where the application was detected (if detected by server agent) |
| version | Detected version of the application |
| vulnerabilities |
List of detected vulnerabilities - CVE: ID of the vulnerability - Score: CVSS Score of the vulnerability - Description: Description of the vulnerability - Link: URL to further information in the Vulnerability Database |
Blacklist
| blacklist | Name of the blacklist which has the current domain listed. |
| reason | List of reasons (categories) for which the domain has been blacklisted |
| blacklistURL | Link to the Blacklist for further information and de-listing (if applicable) |
Defacement
| url | URI on which the defacement has been detected or was reported |
| threat | Name of the detected threat (most commonly the name of a hacker group or a distinguishing feature of a defacement) |
Suspicious Links
| links | List of Links on the website that are blacklisted |
| blacklists | List of Blacklist entries (see Blacklist above) |
SuspiciousRequest
| entity | Blacklisted URL or Domain |
| urls | List of suspicious URLs that were contacted |
| blacklists | List of Blacklist entries (see Blacklist above) |
Webshell
| path | Server-path to the detected file |
| threat | Short name of the detected threat (webshell, exec, obfuscated,...) |
| owner | System user that owns the file |
| group | System group that owns the file |
| permissions | Linux FS permissions of the file |
| mtime | Modified Timestamp as reportet by stat |
| md5 | Checksum of the detected file |
| feature | If PHP code is detected, this string represents the generalized code patterns that are analyzed |
| av | Short name of the detection system (php, yara, lmd) |
| size | Filesize in bytes |
Nimbusec Compliance Monitor Issue Types
Issues
| Name | Event | Description |
| Cookie violation | compliance_cookie_opt_in | Cookies were detected being set before the user provided explicit consent via the cookie banner. This violates privacy regulations. |
| Tracker violation | compliance_tracker_opt_in | Analytical or marketing trackers were initiated before the user provided explicit consent. All non-essential tracking scripts must remain blocked until a valid opt-in is received. |
| LocalsStorage violation |
compliance_local_storage_opt_in
|
Data was written to the browser's LocalStorage before consent was granted. |
Integrations
Discovery Webhooks
Overview
Webhooks allow you to build or set up applications which subscribe to new reports in your Discovery account. When a new report was generated, we'll send a HTTP POST payload to the webhook's configured URL. Webhooks can be used to update an external issue tracker, feed into a SIEM, or even deploy a backup to your production server. You're only limited by your imagination.
Webhooks can be installed and configured exactly like your email or Slack notifiations. Once installed, the webhook will be triggered each time a new report is generated.
Setting up a webhook
Creating a webhook is a two-step process. You'll first need to set up how you want your webhook to behave through Discovery. After that, you'll set up your server to receive and manage the payload.
Setting up a webhook is similiar to setting up email or text notifications. Go to Settings > Notifications and click on "Add Custom Webhook".

Webhook URL: This is the server endpoint that will receive the webhook payload. This URL must be accessible by the Discovery services, so make sure it is not a private URL like in the example image, but publicly accessible.
We recommend that you protect the URL via HTTPS as well.
Payload
The second step to process webhooks is the server to handle the request. Discovery will send a POST request to the specified webhook URL for each new report it generates.
The body of the request has always the content type application/json and the following format:
{
    "id": "string",
    "time": "int",
    "origin": "string",
    "summary": {
        "discovered": "int",
        "responding": "int",
        "scanned": "int",
        "malware": "int",
        "defacement": "int",
        "reputation": "int",
        "application": "int",
        "tls": "int"
    }
}
Securing your webhooks
Once your server is configured to receive payloads, it'll listen for any payload sent to the endpoint you configured. For security reasons, you probably want to limit requests to those coming from Discovery.
Discovery uses a hash signature to sign each webhook payload. This hash signature is passed along with each request in the headers as X-Nimbusec-Signature. Discovery uses PKCS 1 using RSAwithSHA512 to calculate the signature, which is sent encoded as BASE64 in the headers value.
You can use the following example codes to validate the Discovery signature:
Using Java:
public boolean verifySignature(byte[] signature, byte[] data) {
    try {
        PKCS8EncodedKeySpec spec = new PKCS8EncodedKeySpec(Base64.decodeBase64(PRIVATE_KEY));
        PublicKey key = KeyFactory.getInstance("RSA").generatePublic(spec);

        Signature sig = Signature.getInstance("SHA512WithRSA");
        sig.initVerify(key);
        sig.update(data);

        return sig.verify(signature);
    } catch(InvalidKeySpecException | SignatureException | NoSuchAlgorithmException | InvalidKeyException ex) {
        return false;
    }
}
Using Go:
package example

import (
    "crypto"
    "crypto/rsa"
    "crypto/sha512"
)

func VerifySignature(signature []byte, data []byte) bool {
    // Example code to get the Discovery signature
    // header := request.Header.Get("X-Nimbusec-Signature")
    // signature, _ := base64.StdEncoding.DecodeString(header)

    // Example code to get the response body data
    // data, _ := ioutil.ReadAll(r.Body)

    hashed := sha512.Sum512(data)
    err := rsa.VerifyPKCS1v15(PublicKey, crypto.SHA512, hashed[:], signature)
    return err == nil
}
The repository nimbusec-oss/nimbusec-gelf showcases how to verify Discovery webhook signatures as well.
The public key used to verify all Discovery webhook signatures is:
-----BEGIN PUBLIC KEY-----
MIICIjANBgkqhkiG9w0BAQEFAAOCAg8AMIICCgKCAgEAlgbfxMniLiDMRYhRYY0f
fOLEACXSCWmX0/rSL+qib/3cbZAMOEknXUudich4ZuCHulZ9ApaPx/7u+x5jQSj4
aiZXJE+S+LecUqwbq1CSfByLPViyYu2xt2I0tqYdsQK6KmQs2Gl00UP/yxrHtcEz
NaZO8Z7bdL1AY3eW6oPjWeORK91FAEONbnCvXmPoGa/4+AUWr6FmMrjFiG8yM72K
eUvfzyWtZYNeFxJ+2UmqTco1oEdGmwJJYKgPAg4mRXOPBs1Il6W9+bwomUed/Rxd
GHuNPy4b9BOgSyFFoEHQJ2eL+W9IMpWegwV7VxXc37WlHQxoZ1886gO+u3hxvo++
+v0ami3JT1BZriTYdjSydktyUARQQzDaxAsYwUMTs/G++yiF3jt+J43pKvZ+ZSTP
+vXAKd+acbsUmH6WIxsu915BVPcnMgyeUWOK6NojiW4Z4BEuCWVKfqMKRU+LypFN
Hqpd3wxT26jnykJOm0a2xloXlmjS9x/LcHd6onN6I6wdPz8zSAU6lr0T2kWgPY+l
u0Ral9lpafe/Rq6GjPIvrlWNy2hjJhJ1FtzMCgySCs+XEqjFbM2GEOSK4M/NGY9+
zzkNgL4B0HpMHgRNeRfx0q+LuZtuHvNEDxmp/OvvfRqQGo5qqDhojm3rRi5qbsLa
k3siF46a7ml6ONtAD/Eib1kCAwEAAQ==
-----END PUBLIC KEY-----
Nimbusec Webhooks
Overview
Webhooks allow you to build or set up applications which subscribe to certain alerts in your Nimbusec account. When one of those alerts is triggered, we'll send a HTTP POST payload to the webhook's configured URL. Webhooks can be used to update an external issue tracker, feed into a SIEM, or even deploy a backup to your production server. You're only limited by your imagination.
Webhooks can be installed and configured exactly like your email and text notifiations. Once installed, the webhook will be triggered each time one or more subscribed alerts occur.
Setting up a webhook
Creating a webhook is a two-step process. You'll first need to set up how you want your webhook to behave through Nimbusec--what alerts it should listen to. After that, you'll set up your server to receive and manage the payload.
Setting up a webhook is similiar to setting up email or text notifications. Go to Settings > Notifications and click on "Add Webhook".

Webhooks require a few configuration options before you can make use of them. We'll go through each of these settings below.

Webhook URL: This is the server endpoint that will receive the webhook payload. This URL must be accessible by the Nimbusec services, so make sure it is not a private URL like in the example image, but publicly accessible.
We recommend that you protect the URL via HTTPS as well.
Domains: Your webhook will only receive alerts for domains that you select. Select the domains you want to receive alert for in "Available Domains" and you the arrow buttons to move then to "Domains with notifications".
Notification levels: The webhook receives alerts for each new issue Nimbusec detecs (just like email and text notifications). Nimbusec issues are either rated as "medium risk" or "severe risk". You can select with the dropdowns in which alerts you are interested.
Payload
The second step to process webhooks is the server to handle the request. Nimbusec will send a POST request to the specified webhook URL for each new alert it detects.
The body of the request has always the content type application/json and the following format:
{
    "domain": {
        "id": "string",
        "name": "string",
        "url": "string",
        "responseIP": "string",
    },
    "issues": [
        {
            "id": "string",
            "event": "string",
            "category": "string",
            "severity": "int",
                        "regions": ["string"],
                        "viewports": ["string"],
            "details": { /* ... */ }
        },
        // ...
    ]
}
A sample application to receive webhooks can be found in our GitHub repository nimbusec-oss/nimbusec-gelf. This small example implementation receives any Nimbusec alerts and converts them to a GELF message that can be pushed to any GELF processing server like Graylog. It is used internally at nimbusec to feed our own alerts into our SIEM.
Securing your webhooks
Once your server is configured to receive payloads, it'll listen for any payload sent to the endpoint you configured. For security reasons, you probably want to limit requests to those coming from Nimbusec.
Nimbusec uses a hash signature to sign each webhook payload. This hash signature is passed along with each request in the headers as X-Nimbusec-Signature. Nimbusec uses PKCS 1 using RSAwithSHA512 to calculate the signature, which is sent encoded as BASE64 in the headers value.
You can use the following example codes to validate the Nimbusec signature:
Using Java:
public boolean verifySignature(byte[] signature, byte[] data) {
    try {
        PKCS8EncodedKeySpec spec = new PKCS8EncodedKeySpec(Base64.decodeBase64(PRIVATE_KEY));
        PublicKey key = KeyFactory.getInstance("RSA").generatePublic(spec);

        Signature sig = Signature.getInstance("SHA512WithRSA");
        sig.initVerify(key);
        sig.update(data);

        return sig.verify(signature);
    } catch(InvalidKeySpecException | SignatureException | NoSuchAlgorithmException | InvalidKeyException ex) {
        return false;
    }
}
Using Go:
package example

import (
    "crypto"
    "crypto/rsa"
    "crypto/sha512"
)

func VerifySignature(signature []byte, data []byte) bool {
    // Example code to get the Nimbusec signature
    // header := request.Header.Get("X-Nimbusec-Signature")
    // signature, _ := base64.StdEncoding.DecodeString(header)

    // Example code to get the response body data
    // data, _ := ioutil.ReadAll(r.Body)

    hashed := sha512.Sum512(data)
    err := rsa.VerifyPKCS1v15(PublicKey, crypto.SHA512, hashed[:], signature)
    return err == nil
}
The repository nimbusec-oss/nimbusec-gelf showcases how to verify Nimbusec webhook signatures as well.
The public key used to verify all Nimbusec webhook signatures is:
-----BEGIN PUBLIC KEY-----
MIICIjANBgkqhkiG9w0BAQEFAAOCAg8AMIICCgKCAgEAlgbfxMniLiDMRYhRYY0f
fOLEACXSCWmX0/rSL+qib/3cbZAMOEknXUudich4ZuCHulZ9ApaPx/7u+x5jQSj4
aiZXJE+S+LecUqwbq1CSfByLPViyYu2xt2I0tqYdsQK6KmQs2Gl00UP/yxrHtcEz
NaZO8Z7bdL1AY3eW6oPjWeORK91FAEONbnCvXmPoGa/4+AUWr6FmMrjFiG8yM72K
eUvfzyWtZYNeFxJ+2UmqTco1oEdGmwJJYKgPAg4mRXOPBs1Il6W9+bwomUed/Rxd
GHuNPy4b9BOgSyFFoEHQJ2eL+W9IMpWegwV7VxXc37WlHQxoZ1886gO+u3hxvo++
+v0ami3JT1BZriTYdjSydktyUARQQzDaxAsYwUMTs/G++yiF3jt+J43pKvZ+ZSTP
+vXAKd+acbsUmH6WIxsu915BVPcnMgyeUWOK6NojiW4Z4BEuCWVKfqMKRU+LypFN
Hqpd3wxT26jnykJOm0a2xloXlmjS9x/LcHd6onN6I6wdPz8zSAU6lr0T2kWgPY+l
u0Ral9lpafe/Rq6GjPIvrlWNy2hjJhJ1FtzMCgySCs+XEqjFbM2GEOSK4M/NGY9+
zzkNgL4B0HpMHgRNeRfx0q+LuZtuHvNEDxmp/OvvfRqQGo5qqDhojm3rRi5qbsLa
k3siF46a7ml6ONtAD/Eib1kCAwEAAQ==
-----END PUBLIC KEY-----Plesk - Nimbusec Webhosting Security
This how-to guide describes the usage of the Nimbusec Webhosting Security Plugin for Plesk.
Installation & Uninstallation
There are two ways on how the manage the installation and uninstallation of the Plesk plugin.
Manage through Plesk extension store
For installation, please refer to the official Plesk plugin / extension store where the plugin is categorized under Security for easier search. To uninstall the plugin, click on the plugin and select the option uninstall.
Manage via Command-Line
This approach is not adviced for regular non-technical customers and should only be used under consideration of the risks. In order to manage the plugin via the Plesk command line, please refer to the detailed instruction page on the official Github repository: https://github.com/nimbusec-oss/nimbusec-plesk.
Usage
Setup
After successfully installing the Nimbusec Plesk Extension, an initial licence screen is presented as below.

In order to gain access to the plugin, one must select either of two options and obtain the necessary permissions correspondingly.
Get a Licence
A licence containing the required permissions alongs with valid access credentials can be purchased through the official Plesk extensions store: https://www.plesk.com/extensions/nimbusec-agent-integration/. After receiving the licence, the correct option in the licence screen must be selected to active the extension and download the Nimbusec Agent.
Enter API credentials
Please enter your API Key and Secret and click on "Download Server Agent" to intiate the activation. If you don't have API credentials yet, get in contact with plesk@nimbusec.com or issue a support ticket on the official website nimbusec.com for purchase or trial subscriptions.
Settings
The settings screens allow for various configuations the extension:
- Register and unregister Plesk domains in the Nimbusec Portal
- View the Nimbusec Agent Configuration
- Configure schedule and advanced options for the Nimbusec Agent
- Activate the Nimbusec Agent
Register and unregister Plesk domains

The register view shows all domains which are available within your Plesk installation. In order to allow the Nimbusec Agent to scan your domains you must first register them with a plan (e.g link them). To conduct this, select one or more domain you want to register, select the wished plan and click on "Register the selected domains".
The domains will be registered and are moved below the correct plan. From there it is possible to unregister the domains.
In the unregister view you see all domains which are already registered with Nimbusec and grouped by their corresponding plan. In case you want the Nimbusec Agent to stop scanning your domains, select the domains you wish to unregister and click on "Unregister the selected domains".
View the Nimbusec Agent Configuration
The Agent Congfiguration view shows you the current configuration file which is used by the Nimbusec Agent every time it starts scanning. This will give you the possibility of verifying the Agent's functionality. For more information about the agent configuration file, please refer to: https://kb.nimbusec.com/Server Agent/agent-configuration.

Set Run Settings for the Nimbusec Agent
In order to start the Nimbusec Agent's scanning process, it must be activated. This can be done by checking the "Status" checkbox and clicking on "Save settings" afterwards.
Additionally, the Nimbusec Agent must be set to a specific schedule interval. This means basically how often the Nimbusec Agent should scan every day. For that you can choose between one, two, three or four times a day. Again, save the settings afterwards by clicking the "Save settings" button.
Update Agent
This screen gives you an overview about your current Nimbusec Agent installation. The extension will check for an updated version in the background and will show a green/success or yellow/warning message on top of the page in case of an available update. Please check back to this page from time to time.
Dashboard
The Dashboard is very new and shows the issues found on your monitored websites. From there you have the option to
- view the possible malicious files,
- move them to quarantine
- remove from quarantine back to their origin
- this is much likely the case, if a file was moved that is crucial for the website to run

License Key for Support
Sometimes you'll want to ask our support team questions about your Plesk installation. In that case it helps if you also provide the License Key / Subscription ID to us. Because of the General Data Privacy Regulations (GDPR) we do not get any personal / contact data from Plesk, and every entry is pseudonymisied. Only the subscription ID is provided which we use for invoicing Plesk and also provide support if needed.
So here's how to get this information:
- Login to Plesk as admin
- Go to: Tool&Settings > License Management > Additional license key
- Find by “Key name” needed license
- Copy the content of column “Key number” for this license