Server Agent
Additional information about the Nimbusec Server Agent
- Installation on Linux
- Installation on Windows
- Agent Configuration
- Output and Troubleshooting (v19 and higher)
- Docker Image
Installation on Linux
Installation
This guide describes the installation of the Nimbusec Server Agent. The Server Agent is optional for the function of the product, but improves the detection rate greatly. Therefore, it is strongly recommended to install the Server Agent. Installation on Linux and BSD Installation.
Requirements
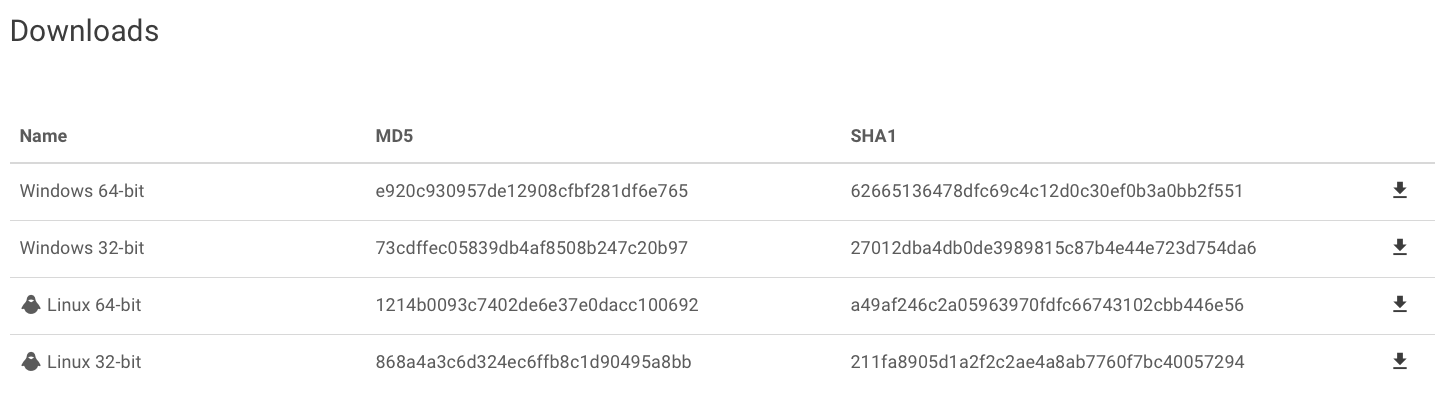
- Download the right Server Agent version for your operating system and architecture from the nimbusec portal.

- Copy the downloaded file to your server (e.g. via scp)
- Create a directory for the Server Agent installation. This can be any directory you like, but we recommend a directory like
/opt/nimbusec - Move the Server Agent and the configuration file in the newly created directory
- Make sure the Server Agent file is executable:
chmod +x /opt/nimbusec/agent - Create a (e.g. daily) cronjob to execute the agent
Create a Cronjob
We recommend two different ways to run our Server Agent:
Method 1: cron.daily
The easiest method is to install a script under /etc/cron.daily. This script will get executed on a daily basis, but the exact time is system dependent. The script would look like the following (make sure it's executable):
/etc/cron.daily/nimbusec
#!/bin/bash
/opt/nimbusec/agent -config /opt/nimbusec/agent.conf
Note: This cron job will run the nimbus-agent as user root! It is not required, nor recommended, to run the Server Agent as user root! To run the Server Agent as a different user, see section Security.
Method 2: crontab
To get more control over the exact time when the agent is run, create a cron job. A cron job to start the Server Agent every day at 1am would look like this:
0 1 * * * /opt/nimbusec/agent -config /opt/nimbusec/agent.conf
Note: It is not required, nor recommended, to run the Server Agent as user root! Please add the cron job to an appropriate user, see section Security.
Method 3: Systemd Timer
A more modern and integrated way of scheduling repeating tasks is through a systemd timer (assuming your distribution uses systemd).
Unlike cron, this requires two config files
/etc/systemd/system/nimbusec-agent.timer
[Unit]
Description=Nimbusec Server Agent

[Timer]
OnCalendar=*-*-* 01:00:00
Unit=nimbusec-agent.service

[Install]
WantedBy=multi-user.target
/etc/systemd/system/nimbusec-agent.service
[Unit]
Description=Run the Nimbusec Server Agent once per day.

[Service]
User=www-data
Type=oneshot
ExecStart=/opt/nimbusec/agent -config /opt/nimbusec/agent.conf

[Install]
To load the config run systemctl daemon-reload. After this you can enable and start time timer with systemctl enable nimbusec-agent.timer && systemctl start nimbusec-agent.timer.
You can adjust the execution time by adjusting the OnCalendar setting (following the syntax year-month-day hour:minute:second). The executing user can be set with User (here www-data). Please check, that the selected user has execute permissions for the agent and read permissions for the scan-directory.
Security
We strongly recommend to run the Server Agent as different user than root.
It is neither required, nor recommended, to run the Server Agent as user root. This section will describe the steps necessary to run it as a different user.
Select a user for the Server Agent to run as who has the following permissions (Recommendation: Run the Server Agent as the same user, as the web server is running or with a different user that has the same permissions as the web servers user):
- The user must have read permission on all files and directories it should scan and monitor.
- The user must have read permission on the configuration file.
- The user must have write permission for the temporary file specified in the configuration.
- Adapt the cron job to start the Server Agent as appropriate user (in the examples as
www-data):
If you have to use the cron.daily method, change the script to something like this: /etc/cron.daily/nimbusec
#!/bin/bash
su -c "/opt/nimbusec/agent -config /opt/nimbusec/agent.conf" www-data
or
#!/bin/bash
sudo -u www-data /opt/nimbusec/agent -config /opt/nimbusec/agent.conf
If you use the traditional crontab method, simply add the cron job to the appropriate user instead of root:
crontab -u www-data -e
Run Server Agent in chroot environment
If you want to further restrict the Server Agent, you can also run it in a chroot environment. Our support will be glad to assist you.
Proxy Configuration for Server Agent
To enable use of a proxy for upload to the Nimbusec API, set the environmental variable "http_proxy" using following syntax: http_proxy=http://[user:pwd@]proxy-ip:port/
An example would be: 'export http_proxy=http://username:pwd@meinproxy:8080'
Logging
You may want to log error messages to a logfile instead std.out. Thats of course no problem. Just pipe the output of the agent to the desired file location like this:
/opt/nimbusec/agent -config /opt/nimbusec/agent.conf > /opt/nimbusec/logs/agent-out.log 2> /opt/nimbusec/logs/agent-err.logInstallation on Windows
This document describes the Install Process of the nimbusec Server Agent under Windows Server 2008 and 2012. The Server Agent adds extended functionality to the nimbsuec service.
Installation
- Download the appropriate version of the Server Agent for your Server from https://portal.nimbusec.com/einstellungen/serveragent
- Copy the the downloaded file to your server and extract its contents. You can choose freely where you want to keep the files. The only requirement is that the user, that will run the Server Agent can access this location and execute the binary.
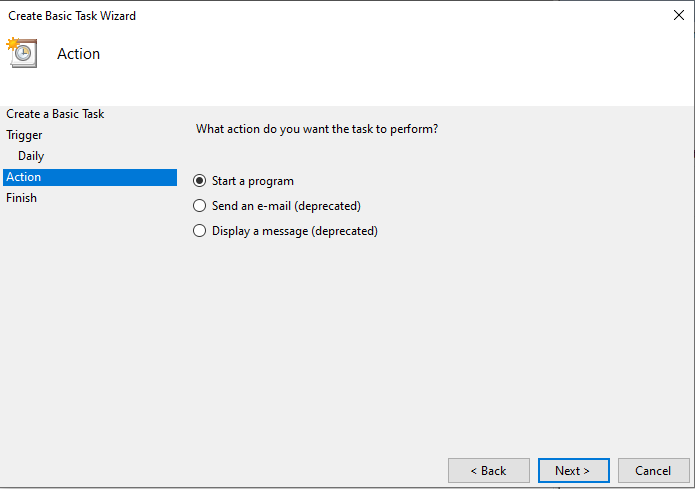
Task Scheduling
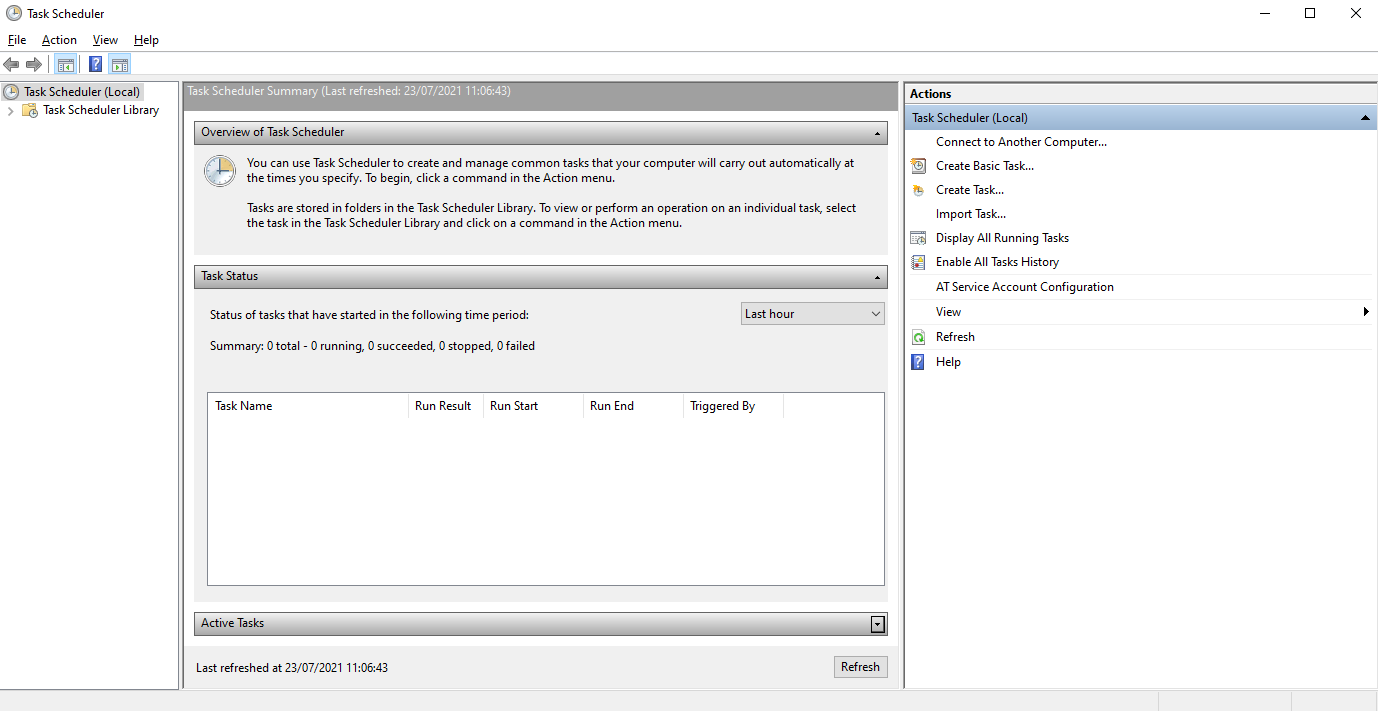
- Open the Task Scheduler

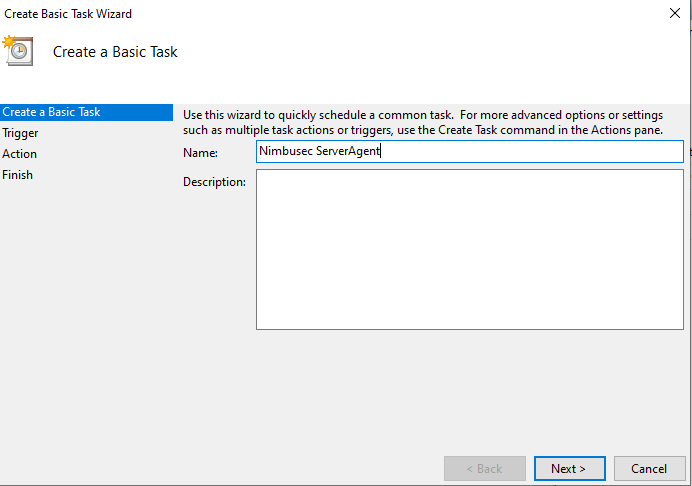
- Select 'Create Basic Task'
- Enter a name of the new Task

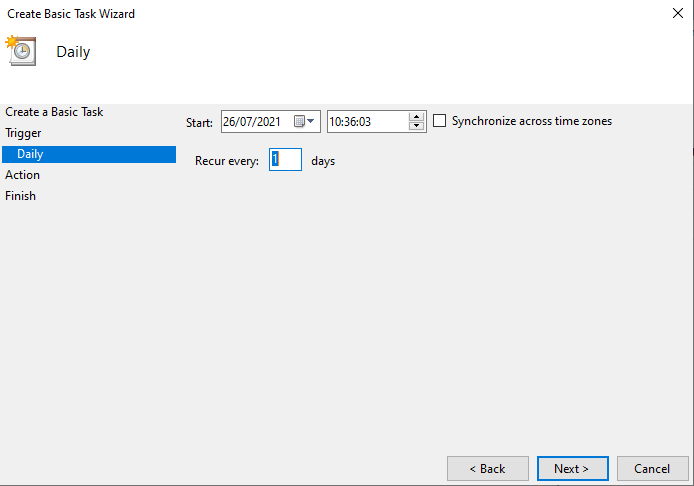
- On the next two screens you can select how often the Server Agent should be run

- Select 'Start a Program' as Action for the Task

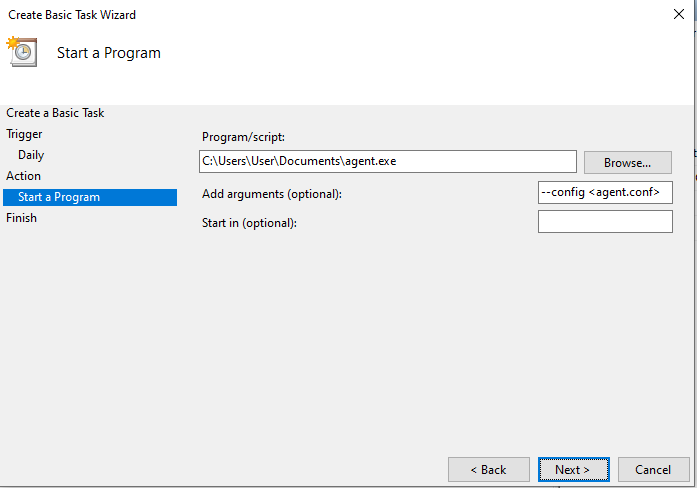
- Click on Browse to select the Server Agent (agent.exe). In the Field 'Add arguments' add the string -config < C:\path\to\agent.conf > (replacing < C:\path\to\agent.conf > with the path to the config file)

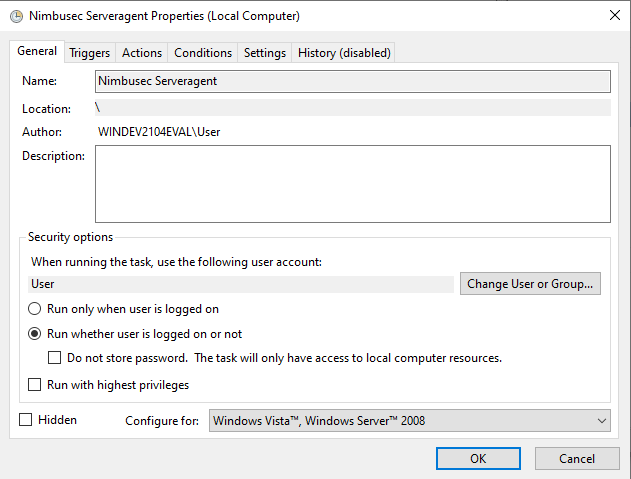
- On the next Screen please tick the checkbox 'Open the Properties dialog for thes task when I click finish' and confirm the screen by clicking 'Finish'
- A new windows will open where you can select which User should execute the Server Agent. Please make sure to select 'Run whether user is logged on or not'. Otherwise the Server Agent will not be run in the background.

Proxy Configuration for Server Agent
To enable use of a proxy for upload to the Nimbusec API, set the environmental variable "http_proxy" using following syntax: http_proxy=http://[user:pwd@]proxy-ip:port/ For the Windows Command Prompt an example would be: 'set http_proxy=http://username:pwd@meinproxy:8080'
Agent Configuration
This how-to describes the manual configuration of the Server Agent
Known Limitation
Please note: The upload size of the analysis result is limited to 750MB. To ensure consistency of results, the data will not be analysed if the limit is exceeded.
All errors of the agent, including https communication with the Nimbusec API will be printed to the terminal.
Format
The format of the Server Agent configuration must be in valid JSON. Otherwise the SErver Agent will fail to start. This can be tested with JSON Lint
An example configuration looks like:
Single domain configuration
agent.conf (Linux)
{
  "key": "abc",
  "secret": "abc",
  "tmpfile": "hashes.txt",
  "domains": {
    "example.com": "/var/www/example.com"
  },
  "excludeDir": [ ],
  "excludeRegexp": [ ],
  "includeDir": [ ],
  "includeRegexp": [ ],
  "apiserver": "https://api.nimbusec.com"
}
agent.conf (Windows)
{
  "key": "abc",
  "secret": "abc",
  "tmpfile": "hashes.txt",
  "domains": {
    "example.com": "C:\\iis\\example.com"
  },
  "excludeDir": [ ],
  "excludeRegexp": [ ],
  "includeDir": [ ],
  "includeRegexp": [ ],
  "apiserver": "https://api.nimbusec.com"
}
Multi domain configuration
agent.conf (Linux)
{
  "key": "abc",
  "secret": "abc",
  "tmpfile": "hashes.txt",
  "domains": {
    "example.com": "/var/www/example.com",
    "demo.co.at": "/var/www/demo.co.at"
  },
  "excludeDir": [ ],
  "excludeRegexp": [ ],
  "includeDir": [ ],
  "includeRegexp": [ ],
  "apiserver": "https://api.nimbusec.com"
}
agent.conf (Windows)
{
  "key": "abc",
  "secret": "abc",
  "tmpfile": "hashes.txt",
  "domains": {
    "example.com": "C:\\iis\\example.com",
    "demo.co.at": "C:\\iis\\demo.co.at"
  },
  "excludeDir": [ ],
  "excludeRegexp": [ ],
  "includeDir": [ ],
  "includeRegexp": [ ],
  "apiserver": "https://api.nimbusec.com"
}
| Field | Description |
|---|---|
| key | Your assigned customer key for the Server Agent. The key can be via https://portal.nimbusec.com/einstellungen/serveragent or by requesting a new from support@nimbusec.com. The key is unique per server and must not be used across multiple servers. |
| secret | Your assigned customer secret for the Server Agent. The secret can be retrieved via https://portal.nimbusec.com/einstellungen/serveragent or by requesting a new from support@nimbusec.com . The secret is bound to a key. |
| tmpfile | Path to a writable location where the Server Agent can store it's temporary file. This file contains the data that is sent to the nimbusec API to analysis and will not get deleted after, but overwritten with each run. Each domain counts as a separate run. This enables you to inspect the data we send to our API. |
| domains | A key value map of domain names and corresponding document roots. The domain name must match the domain name in the portal, else the upload will fail with a access denied message. The document root is the root directory which should be scanned. On Windows the backslashes must be escaped. You can also use forward slashes on Windows. |
| excludeDir | A list of directories which should be skipped. The directories must be absolute file paths. Neither baseline nor webshell analysis will be performed inside these directories! |
| excludeRegexp | A list of regular expressions. If a regular expression matches a file path, the file will be ignored. Be very sure to make the regular expression as strict as possible. The syntax of the regular expressions accepted is the same general syntax used by Perl, Python, and other languages. More precisely, it is the syntax accepted by RE2 and described at http://code.google.com/p/re2/wiki/Syntax , except for \C. Neither baseline nor webshell analysis will be performed inside these files! |
| includeDir | A list of directories which should be included. The directories must be absolute file paths. If this list contains entries, only directories, that begin with the specified values will be regarded for baseline and webshell analysis. All other directories will be disregarded. E.g. document root is /var/www, if /var/www/a is specified /var/www/a files and directories below will be analysed while everything else below /var/www will be ignored. |
| includeRegexp | A list of regular expressions. If a regular expression matches a file path, the file will be anylsed. Be very sure to make the regular expression as strict as possible. The syntax of the regular expressions accepted is the same general syntax used by Perl, Python, and other languages. More precisely, it is the syntax accepted by RE2 and described at http://code.google.com/p/re2/wiki/Syntax , except for \C. Neither baseline nor webshell analysis will be performed inside these files! |
| apiserver | The url of our API server. Only change this if told you by the nimbusec support! |
Command Line Options
The agent can be run with the following parameters: (Not all options are available in all versions of the agent)
| Parameter | Version | Description |
|---|---|---|
| -h | * | Displays help and exits. |
| -config string | * | Configuration file for nimbusec agent (default "agent.conf") |
| -follow-symlinks TRUE / FALSE | * | Toggle following symlinks (default true) |
| -maxprocs int | * | Maximum number of processes used (default 2) |
| -v | 11 | Displays the version and exits. |
| -yara | 11 | Enable YARA engine. |
Output and Troubleshooting (v19 and higher)
PLEASE NOTE: This page applies to Nimbusec Server Agent v19 or higher.
This section describes the expected output of the Nimbusec Server Agent and covers the success case as well as common error conditions.
Exit Codes
If you run the server agent as through scheduling like cron or windows scheduled tasks or you use the server agent as part of a scripted automation you can test for the following exit codes to trigger actions or send notifications.
| Code | Meaning |
| 0 | Success. The agent scanned all configured directories and was able to upload all scan results to the Nimbusec Servers. |
| 1 | An error occurred while reading the configuration through the config file or the environment variables. Due to this no scans were performed. |
| 2 | An unknown command line parameter was used when starting the server agent. |
| 3 | An error occurred during at least one scan. Unaffected domains may have been scanned successfully. Please check the logs to see errors and affected domains. |
| 4 | An error occurred during at least one upload of scan results. Unaffected domains may have been scanned successfully. Please check the logs to see errors and affected domains. |
Log Output
The log output of server agent is structured as follows:
General Messages: Date Time [log level] log message
Domain Specific Messages: Date Time [log level][domain] log message
Log Level can be [info] to indicate an information-message or [error] indicating an error condition. If [error] is followed by [domain] the error message only relates to the scan for this domain.
The following example shows the log output for a scan with multiple domains (nimbusec.com, cyberrisk-rating.at, portal.nimbusec.com).
$ ./nimbusagent-linux-64bit-v19.bin -yara
2026/07/21 16:45:57 [info] nimbusec agent 19.89
2026/07/21 16:45:57 [info] loading signatures from nimbusec finished
2026/07/21 16:45:57 [info][nimbusec.com] begin scan
2026/07/21 16:46:00 [info][nimbusec.com] sending baseline to https://api.nimbusec.com/domain/bmltYnVzZWMuY29t/baseline
2026/07/21 16:46:00 [info][nimbusec.com] sent baseline: Status 200 OK
2026/07/21 16:46:00 [info][cyberrisk-rating.at] begin scan
2026/07/21 16:46:02 [info][cyberrisk-rating.at] sending baseline to https://api.nimbusec.com/domain/Y3liZXJyaXNrLXJhdGluZy5hdA==/baseline
2026/07/21 16:46:02 [info][cyberrisk-rating.at] sent baseline: Status 200 OK
2026/07/21 16:46:02 [info][portal.nimbusec.com] begin scan
2026/07/21 16:46:04 [info][portal.nimbusec.com] sending baseline to https://api.nimbusec.com/domain/cG9ydGFsLm5pbWJ1c2VjLmNvbQ==/baseline
2026/07/21 16:46:05 [info][portal.nimbusec.com] sent baseline: Status 200 OK
Common Error Messages
oauth2: "invalid_client"
$ ./nimbusagent-linux-64bit-v19.bin -yara
2026/07/21 16:48:57 [info] nimbusec agent 19.89
2026/07/21 16:48:57 [error] "yara": failed to get signature: Get "https://api.nimbusec.com/yara?build=85&version=19": oauth2: "invalid_client"
$ ./nimbusagent-linux-64bit-v19.bin
2026/07/21 17:02:13 [info] nimbusec agent 19.89
2026/07/21 17:02:13 [info][nimbusec.com] begin scan
2026/07/21 17:02:13 [info][nimbusec.com] sending baseline to https://api.nimbusec.com/domain/bmltYnVzZWMuY29t/baseline
2026/07/21 17:02:13 [error][nimbusec.com] could not send results: Put "https://api.nimbusec.com/domain/bmltYnVzZWMuY29t/baseline?build=89&version=19": oauth2: "invalid_client"
2026/07/21 17:02:13 [info][cyberrisk-rating.at] begin scan
2026/07/21 17:02:14 [info][cyberrisk-rating.at] sending baseline to https://api.nimbusec.com/domain/Y3liZXJyaXNrLXJhdGluZy5hdA==/baseline
2026/07/21 17:02:14 [error][cyberrisk-rating.at] could not send results: Put "https://api.nimbusec.com/domain/Y3liZXJyaXNrLXJhdGluZy5hdA==/baseline?build=89&version=19": oauth2: "invalid_client"
2026/07/21 17:02:14 [info][portal.nimbusec.com] begin scan
2026/07/21 17:02:14 [info][portal.nimbusec.com] sending baseline to https://api.nimbusec.com/domain/cG9ydGFsLm5pbWJ1c2VjLmNvbQ==/baseline
2026/07/21 17:02:14 [error][portal.nimbusec.com] could not send results: Put "https://api.nimbusec.com/domain/cG9ydGFsLm5pbWJ1c2VjLmNvbQ==/baseline?build=89&version=19": oauth2: "invalid_client"The most common reason for this an error in the API key or secret. The message indicates that the server agent could not authenticate with the Nimbusec API Server.
While both screenshots share the same error message, the first case happens during initialization and prevents loading the required signatures. Therefore the the exit code is 1.
The second case occurs during the upload of a scan result and the agent exits with status 4 after the last upload.
no such file or directory
$ ./nimbusagent-linux-64bit-v19.bin
2026/07/21 17:04:56 [info] nimbusec agent 19.89
2026/07/21 17:04:56 [info][nimbusec.com] begin scan
2026/07/21 17:04:56 [error][nimbusec.com] lstat ./nonexistent/: no such file or directory
2026/07/21 17:04:56 [info][nimbusec.com] sending baseline to https://api.nimbusec.com/domain/bmltYnVzZWMuY29t/baseline
2026/07/21 17:04:56 [info][nimbusec.com] sent baseline: Status 200 OK
The configured directory could not be found.
Exit Status: 3
permission denied
$ ./nimbusagent-linux-64bit-v19.bin
2026/07/21 17:06:07 [info] nimbusec agent 19.89
2026/07/21 17:06:07 [info][nimbusec.com] begin scan
2026/07/21 17:06:07 [error][nimbusec.com] open /root/: permission denied
2026/07/21 17:06:07 [info][nimbusec.com] sending baseline to https://api.nimbusec.com/domain/bmltYnVzZWMuY29t/baseline
2026/07/21 17:06:07 [info][nimbusec.com] sent baseline: Status 200 OK
The configured directory was found but the permissions prevented the server agent from scanning its contents.
Exit Status: 3
Status 403 Forbidden
$ ./nimbusagent-linux-64bit-v19.bin
2026/07/21 17:06:50 [info] nimbusec agent 19.89
2026/07/21 17:06:50 [info][discovery.nimbusec.com] begin scan
2026/07/21 17:06:50 [info][discovery.nimbusec.com] sending baseline to https://api.nimbusec.com/domain/ZGlzY292ZXJ5Lm5pbWJ1c2VjLmNvbQ==/baseline
2026/07/21 17:06:50 [info][discovery.nimbusec.com] sent baseline: Status 403 Forbidden
This error occurs if the configured domain does not match any of the domains which are configured in your website security monitor account.
Note: www.example.com and example.com do not count as matching domains as the full domain name must be identical.
Exit Status: 4
Docker Image
Nimbusec Server Agent Docker Image
This docker image is intended for use with the Website Security Monitor by KSV1870 Nimbusec (https://nimbusec.com). Use of this image requires an active subscription to Website Security Monitor.
This image is published under https://hub.docker.com/r/ksv1870nimbusec/server-agent
What is Nimbusec Server Agent Docker Image?
Let's answer this question step by step.
Nimbusec Website Security Monitor is a cloud-based monitoring solution to check for malicious malipulations on websites.
Nimbusec Server Agent is the server side component of Website Security Monitor. It checks PHP code that is interpreted on the server and therefore cannot be analysed through http requests (as it is interpreted before being sent to the client).
Nimbusec Server Agent Docker Image is a convenient method of distributing the Server Agent to Nimbusec Customers. Its sole purpose is to run the contained server agent.
Basic Assumptions
The server agent runs unprivileged. Per default it runs with the user id 1000. You can supply any user ID if you need to match the permissions of your scan target. While you can run the container privileged or as user root, this is strongly discouraged.
Configuration
Nimbusec Server Agent uses a config file to read instructions. This config file adheres to the following structure.
{
  "key": "$KEY",
  "secret": "$SECRET",
  "domains": {
    "$DOMAIN": "$TARGET_DIR"
  },
  "tmpfile": "/tmp/nimbusagent-hashes.txt",
  "excludeDir": [],
  "excludeRegexp": [],
  "includeDir": [],
  "includeRegexp": [],
  "apiserver": "$API_SERVER"
}
All $-Placeholders need to be provided except for $TARGET_DIR and $API_SERVER. For these two this docker image can fall back on the following default values:
- $TARGET_DIR: /app/scan
- $API_SERVER: https://api.nimbusec.com
In addition to the configuration options listed above there is one setting that can only be enabled via Environment Variable in this image. Adding the env YARA=true will enable the optional support for yara scan rules. The ruleset is downloaded from the API Server when the server agent is executed.
For additional Information please refer to the Knowledge Base.
Mount your own agent.conf
The most flexible way to provide a configuration is to mount to the container-path /app/agent.config (please note, this path and filename is mandatory). This mount can be read-only
You need to replace the $KEY an $SECRET placeholders from the above example with the corresponding values provided by KSV1870 Nimbusec. For $DOMAIN you can select any Domain that you have configured in your Nimbusec Website Security Monitor Account. Please note, you have to use the correct Style of the domain, i.e. example.com and www.example.com are treated as different domains.
docker run -v /local_path_to_config/agent.conf:/app/agent.conf:ro -v /var/www/html:/app/scan:ro <dockerimage>
This example mounts a local config file and the scan dir of /var/www/html into the container, both read-only.
Pass Environment Variables
If you don't want to provide a custom config file you can pass the Placeholder values (KEY, SECRET, DOMAIN and optionally TARGET_DIR) as environment variables (docker via -e, docker-compose via environment).
docker run -v /var/www/html:/app/scan:ro -e KEY=api-key -e SECRET=api-secret -e DOMAIN=example.com <dockerimage>
This example mounts the target /var/www/html into the container and provides key, secret and domain via enviroment variable.
What gets scanned?
The directory to scan needs to be mounted into the container, either into the default location /app/scan or in a custom directory which is specified via your agent.conf or the TARGET_DIR environement variable. This mount should be read-only. The server agent will not write into this directory.
docker run -v /local_path_to_config/agent.conf:/app/agent.conf:ro -v /var/www/html:/mnt/html:ro -e TARGET_DIR=/mnt/html -e YARA=true <dockerimage>
This example mounts the local config file and the target dir into the container. As the target dir in the container is different from /app/scan we have to specify the container directory to scan as /mnt/html. In addition the YARA env variable enables yara support and downloads the scan rules form the api server.
Recommendations
- It is recommended that you prefer mounting your own agent.conf file over environment variables. It is easier for you to check what the agent is doing where. Additionally you can scan multiple domains with one config. This is not possible with the env variables.
- It is recommended to mount the scan directory under /app/scan. Fallbacks will assume this directory if there is misconfiguration.
- It is recommended to mount all files and directories mentioned so far as read-only. There is one optional exception which is explained in the following "Advanced" section.
Advanced
If you want additional insight into the workings of the server agent you can mount the container tmp dir to a local directory. This mount has to be read/write and has to have these permissions for the User ID that runs the agent (either 1000 or a value that you can set via the -u/--user flag).
docker run -v /local_path_to_config/agent.conf:/app/agent.conf:ro -v /var/www/html:/app/scan:ro -u 1234 <dockerimage>
Assuming that the data in the local directory /var/www/html is only readable to user ID 1234, you can provide this ID to the docker container. The server agent in the container is executed with the user ID 1234.